Table of Contents
- Introduction
- Quick Start
- Getting Started
- Tagging, Taking and Uploading Photos
- 4.1 Allowing Camera Access (iOS Safari & Android Chrome)
- 4.2 Creating and Using Tags
- 4.3 Capturing Photos
- 4.4 Uploading Photos From Your Device
- 4.5 Capturing Photos Offline
- 4.6 Adding Photos from a Record in Salesforce (Desktop)
- 4.7 Adding Photos from a Record in Salesforce Mobile
- 4.8 Upload Guidelines & File Types
- Editing & Managing Photos
- Bulk Actions
- Managing Album Access for Other Users
- Palixo in Salesforce
- Emailing Photos From Salesforce
- Sharing Photo Collections
- Account Settings
- Troubleshooting & FAQs
- Contact & Support
1. Introduction
1.1 What is Palixo?
Palixo is a cloud-based photo management application designed specifically for businesses that need to capture, organise, and share work-related images. Whether you're documenting job sites, capturing before-and-after photos, or managing visual records for client projects, Palixo provides a streamlined solution.
Key characteristics:
- Images only — Palixo is purpose-built for photo management. Unlike general file storage solutions, every feature is optimised for capturing, tagging, and sharing images.
- Web app on desktop and mobile — Access Palixo from any device with a web browser. The interface automatically adapts to your screen size, providing the same powerful features whether you're in the office or on-site.
- Secure cloud storage — All your photos are stored privately and securely on Amazon Web Services (AWS) infrastructure, ensuring enterprise-grade security and reliability.
1.2 Key Features Overview
Palixo is built around three core concepts:
Two Album Types
- Personal Album — A private album that cannot be shared with others. Use this for personal reference photos or images you don't need to collaborate on.
- Work Album — Shareable albums where you can invite team members to view, contribute, or manage photos together.
Tag-Based Organisation
All photos in Palixo are organised using tags rather than folders. Tags are flexible labels you attach to photos, allowing a single photo to belong to multiple categories. For example, a photo could be tagged with both "deck-repairs" and "before" to show it's a before shot of a deck repair job.
Salesforce Integration
Palixo integrates seamlessly with Salesforce, allowing you to:
- Capture photos directly from records with the Cloud Images component
- Automatically tag photos based on admin-configured fields
- Email photos to clients without storage attachments
1.3 Supported Devices and Browsers
Palixo works on any modern device with a web browser:
| Platform | Supported Browsers |
|---|---|
| Desktop (Windows/Mac) | Chrome, Firefox, Safari, Edge (latest versions) |
| iOS (iPhone/iPad) | Safari (iOS 14+) |
| Android | Chrome (latest version) |
2. Quick Start
Get up and running with Palixo in just a few minutes. This guide assumes you already have an account.
Step 1: Log In
- Open your web browser and navigate to https://palixo.media
- Click Log In and enter your credentials
- You'll be taken to your Home screen showing your available albums
Step 2: Open an Album
- From the Home screen, click on an album to open it
- You'll see a grid of photos (if any exist) and the tag filter bar at the top
Step 3: Take Your First Photo
- Click the blue + button at the bottom of the screen
- If prompted, allow camera access in your browser
- The camera view will open — you'll see a live preview
- Add tags in the tag bar (e.g., type "test-photo") and click add
- Tap the white capture button to take a photo
- Your photo appears in the thumbnail sidebar — it's automatically saved
- Click the checkmark (Done) button when finished
Step 4: View Your Photo
- Return to the album view
- Your new photo appears in the grid
- Click on it to view full size and see its details
3. Getting Started
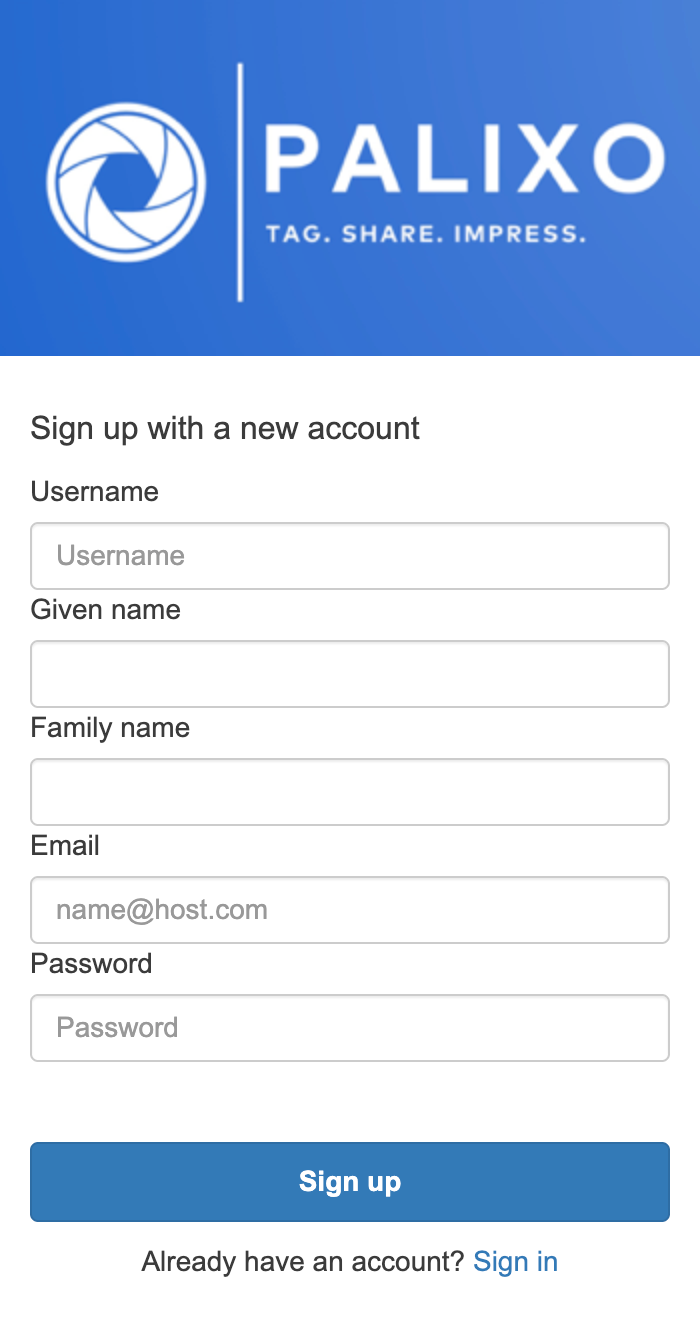
3.1 Signing Up
There are two ways to create a Palixo account:
Self Sign-Up
- Navigate to https://palixo.media
- Click Sign Up
- Enter your email address and create a password
- Verify your email address via the confirmation link sent to you
- Complete your profile setup
Via Email Invitation
If a colleague invites you to an album:
- You'll receive an email with the subject "You've been invited to Palixo"
- Click the Accept Invitation button in the email
- If you don't have an account, you'll be prompted to create one
- Once registered, you'll automatically have access to the album you were invited to
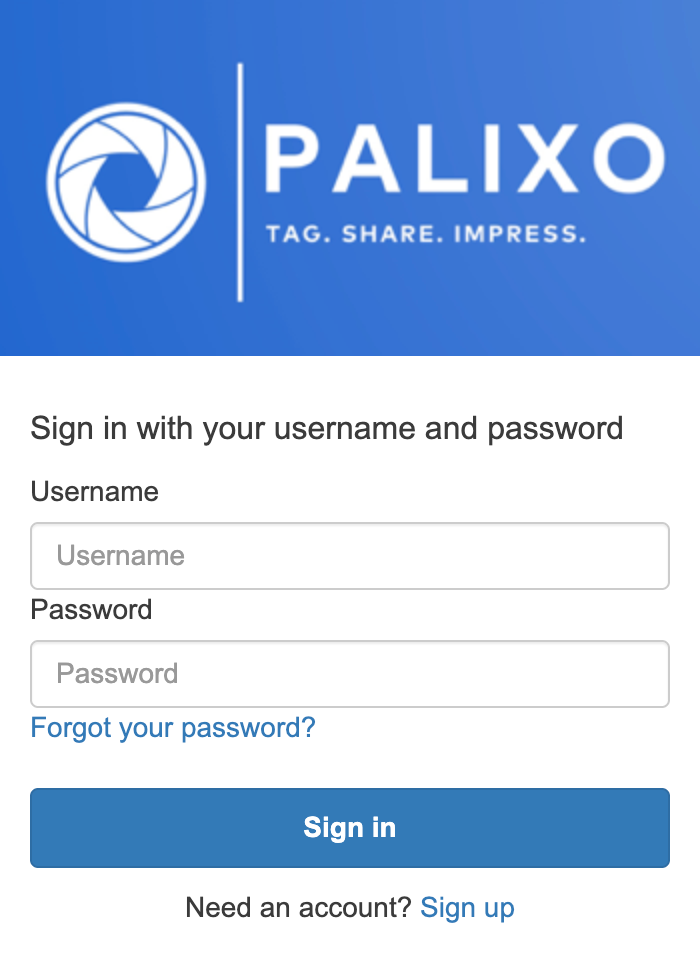
3.2 Logging In
- Navigate to https://palixo.media in a web browser
- Click Log In
- Enter your email address or username and password
- Click Sign In
You'll be directed to your Home screen, which displays all albums you have access to.
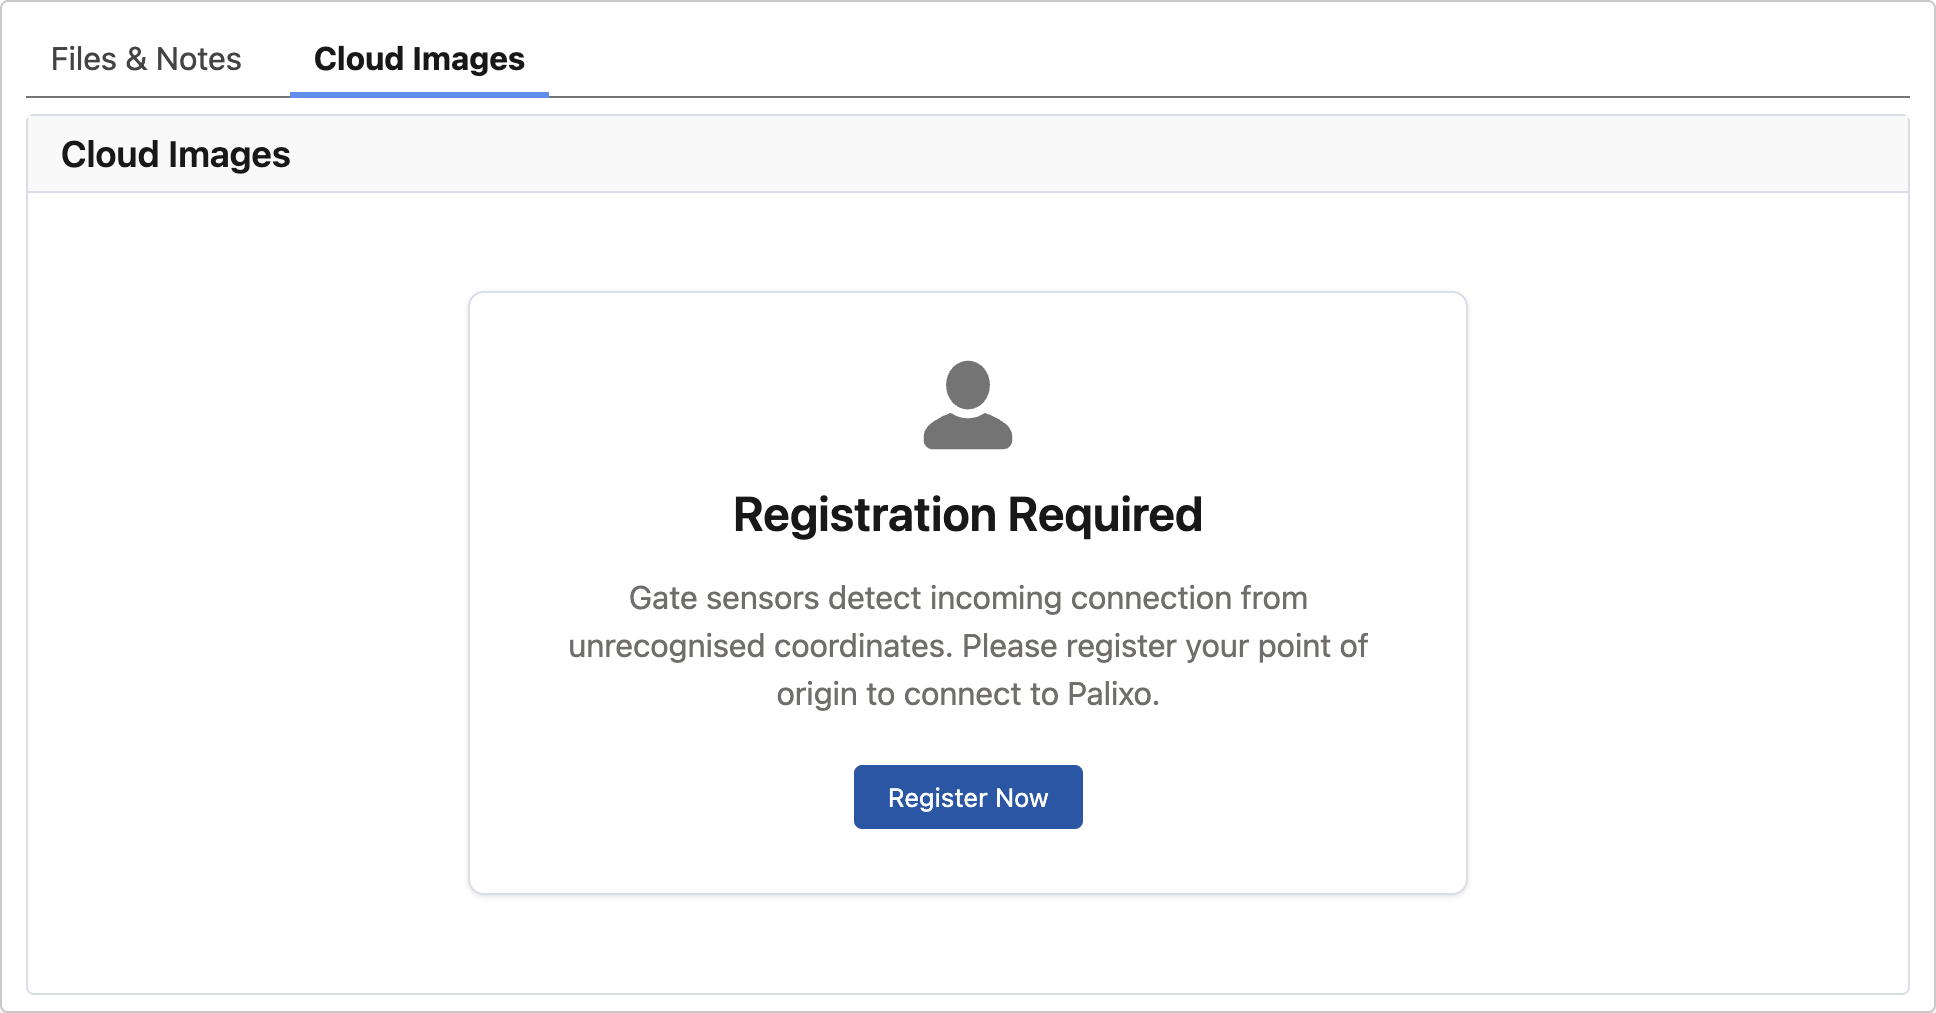
3.3 Registering Palixo in Salesforce (Desktop & Mobile)
To use Palixo within Salesforce, you need to register your Salesforce organisation:
On Salesforce Desktop and Mobile:
- Navigate to any record with the Cloud Images component available
- Look for the "Cloud Images" tab in the side panel or related items
- Click Register Now
- Log in to your Palixo account if prompted
Once registered, photos you take will automatically be visible in Salesforce.
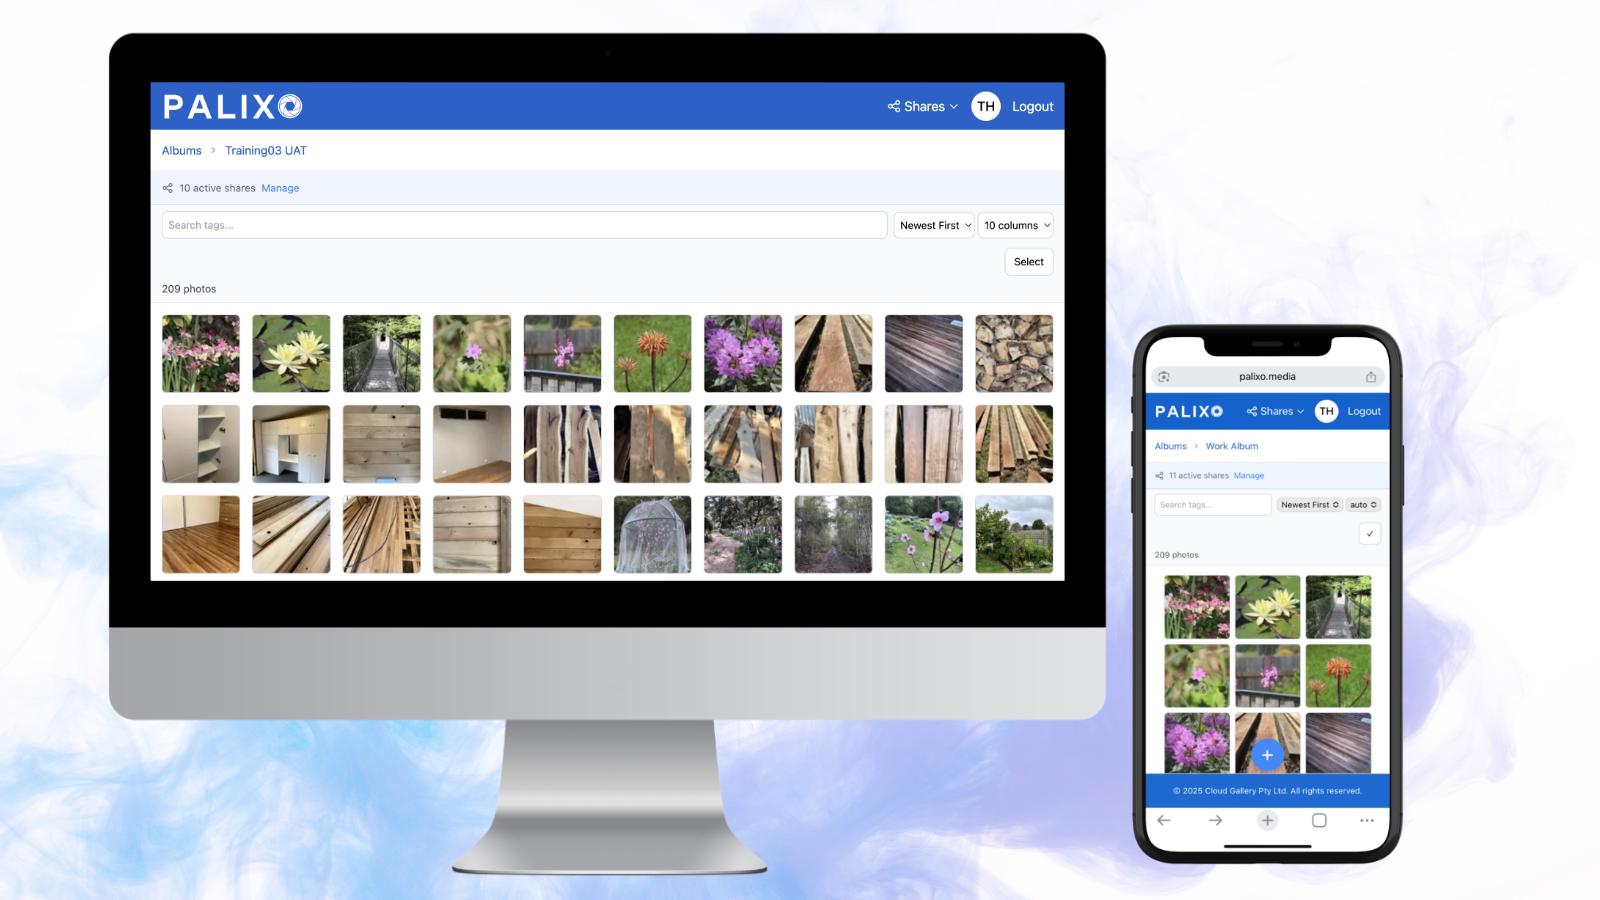
3.4 Palixo Web App Interface
Understanding the Palixo interface will help you work more efficiently.
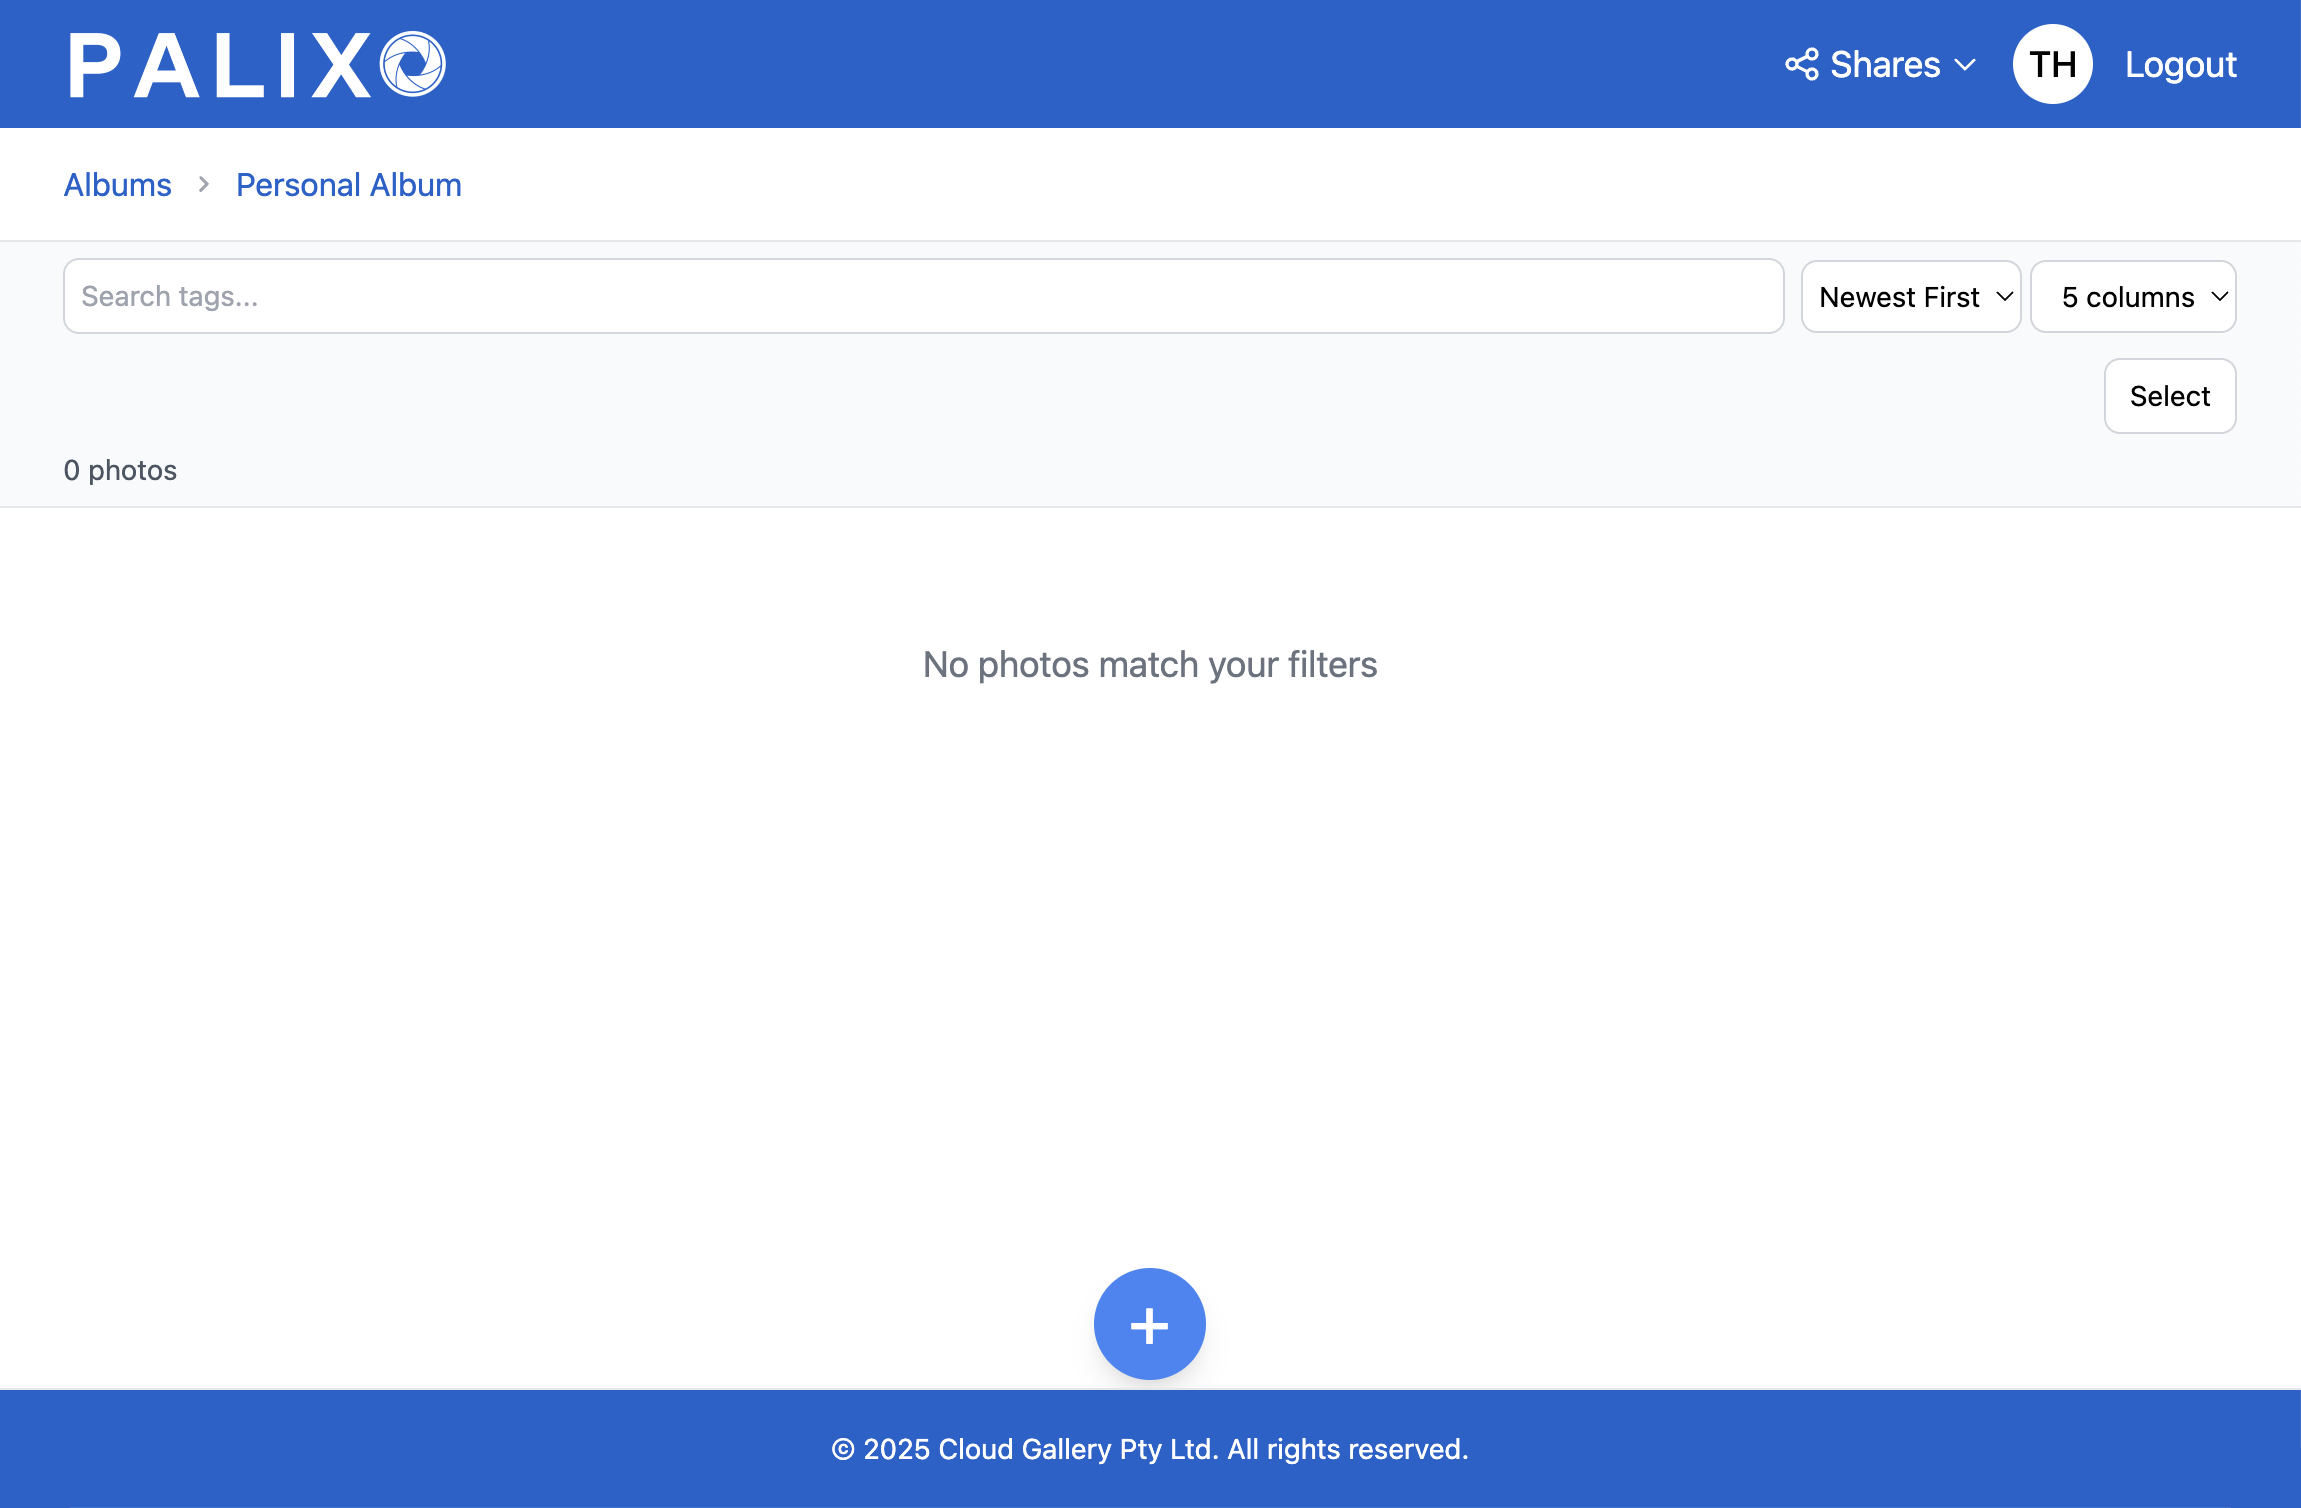
Home Screen
The Home screen is your starting point, displaying all albums you have access to:
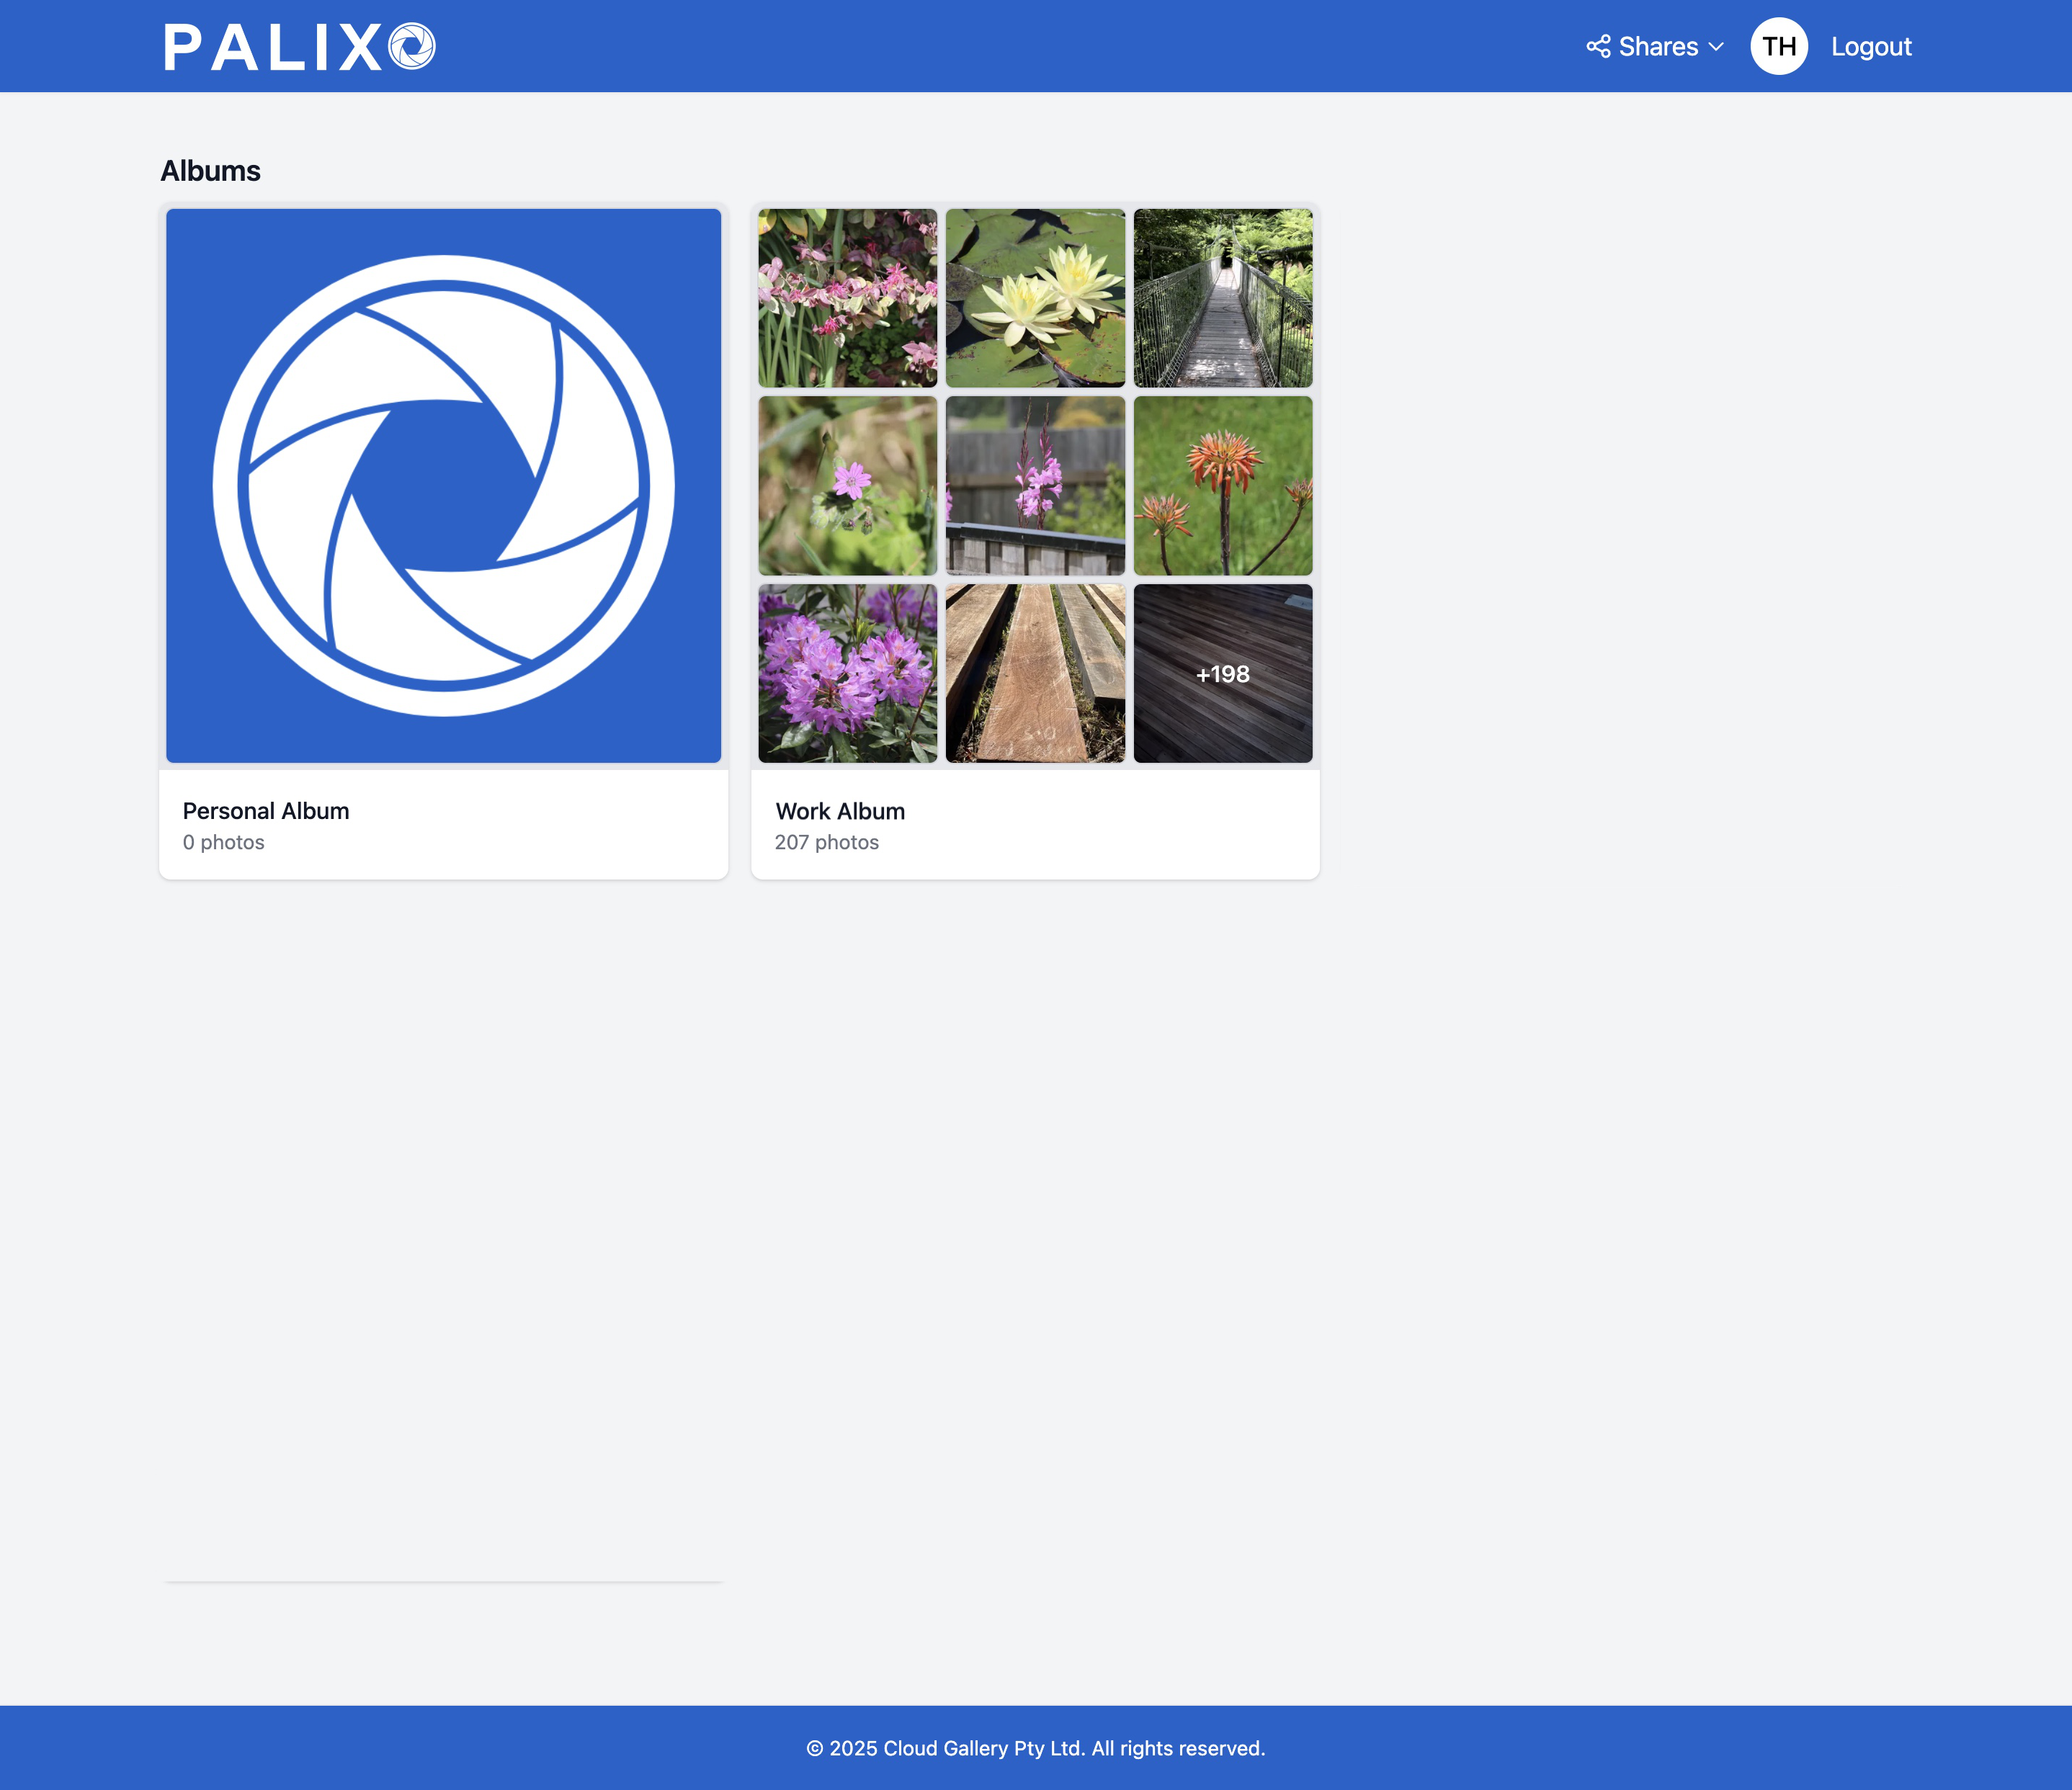
Album View
When you open an album, you'll see:
Header Bar
- Shares dropdown — Access album sharing settings and your collections
- Profile icon — Click your initials to access account settings
- Logout — Sign out of Palixo
Album Controls
- Search box — Search for photos by tags
- Sort dropdown — Change how photos are ordered (newest first, oldest first, etc.)
- Columns view — Toggle between grid sizes (more or fewer columns)
Tag Filter Bar
- Shows currently active filter tags as removable pills
- Show/Hide Tags Toggle — Expand or collapse to show all available tags in the album
Photo Grid
- Displays thumbnails of all photos matching your current filters
- Click any photo to view it in detail
Add Photos Button
- The blue + button at the bottom opens the camera

4. Tagging, Taking and Uploading Photos
This section covers the core functionality of Palixo: capturing and organising your photos.
4.1 Allowing Camera Access (iOS Safari & Android Chrome)
Before you can take photos, you need to grant Palixo permission to use your device's camera.
iOS Safari:
- When you first tap the capture button, Safari will ask for camera permission
- Tap Allow
- To always allow camera access without being asked each time, click camera icon in address bar > three dot menu > scroll to bottom and set camera to Allow
- If you accidentally denied permission, use the same steps to change Camera from Deny to Allow
Android Chrome:
- Chrome will display a permission dialog when you first access the camera
- Tap Allow
- To always allow camera access, tap the lock icon in the address bar, tap Permissions, then set Camera to Allow
- If you accidentally denied permission, use the same steps to change Camera from Block to Allow
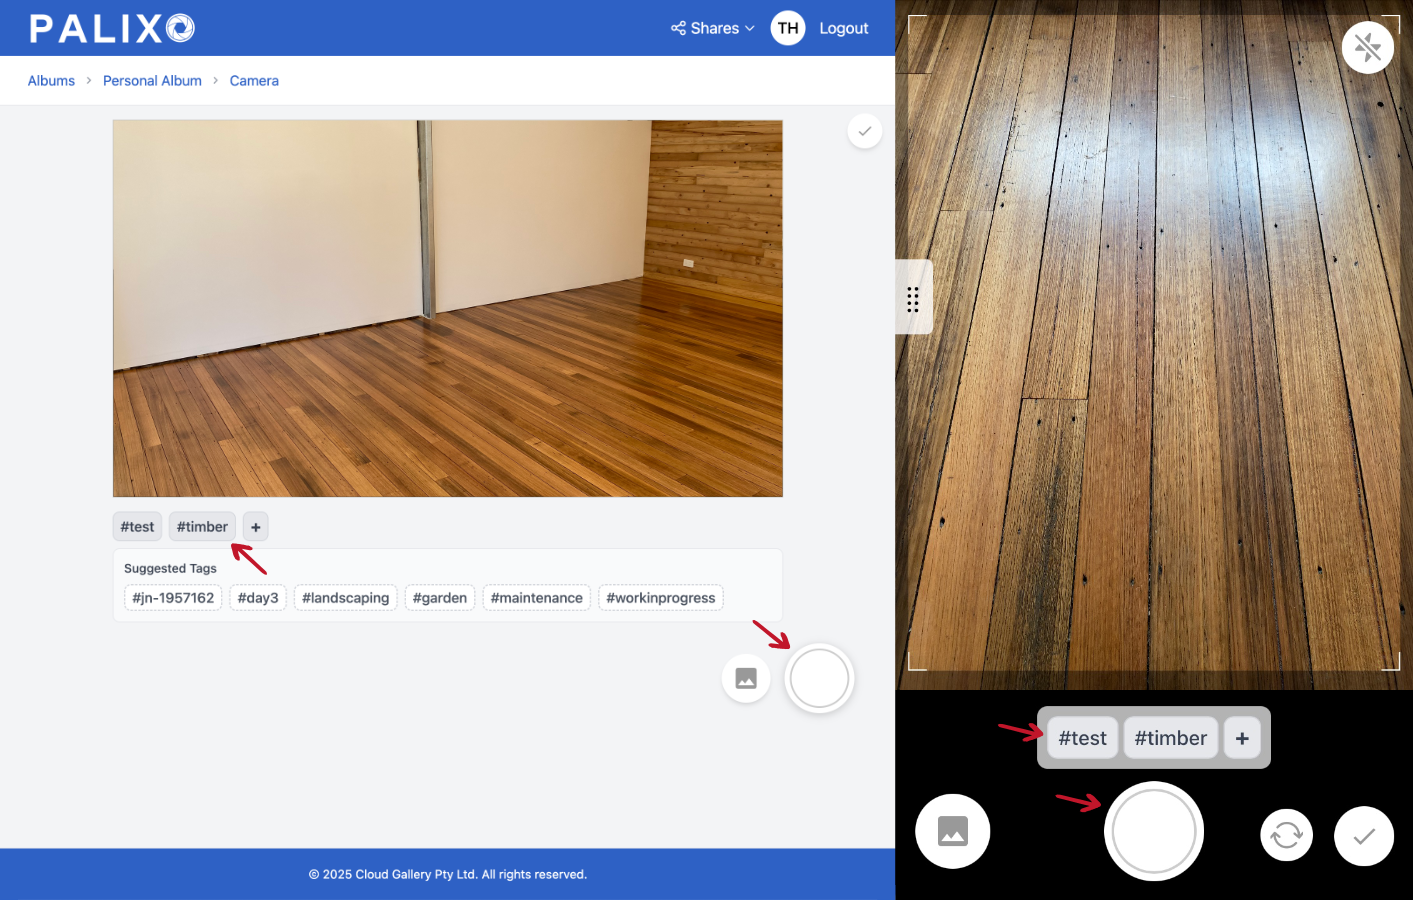
4.2 Creating and Using Tags
Tags are the foundation of organisation in Palixo. Understanding how to use them effectively will make finding photos much easier.
Tag Rules
- Lowercase only — All tags are automatically converted to lowercase for consistency
- Any characters — You can use letters, numbers, and hyphens in tags
- Character limit — Tags have a maximum length of 50 characters
- No spaces in tags — Use hyphens to separate words (e.g., "deck-repair" not "deck repair")
Creating Multiple Tags
You can add multiple tags to a photo at once:
- Type your first tag
- Press Space to start a new tag
- Continue typing additional tags separated by spaces
- Click the Tick button to apply all tags
- Each tag appears as a pill in the tag bar
Example: Type before deck-repair job-12345 then click the tick button to create three tags.
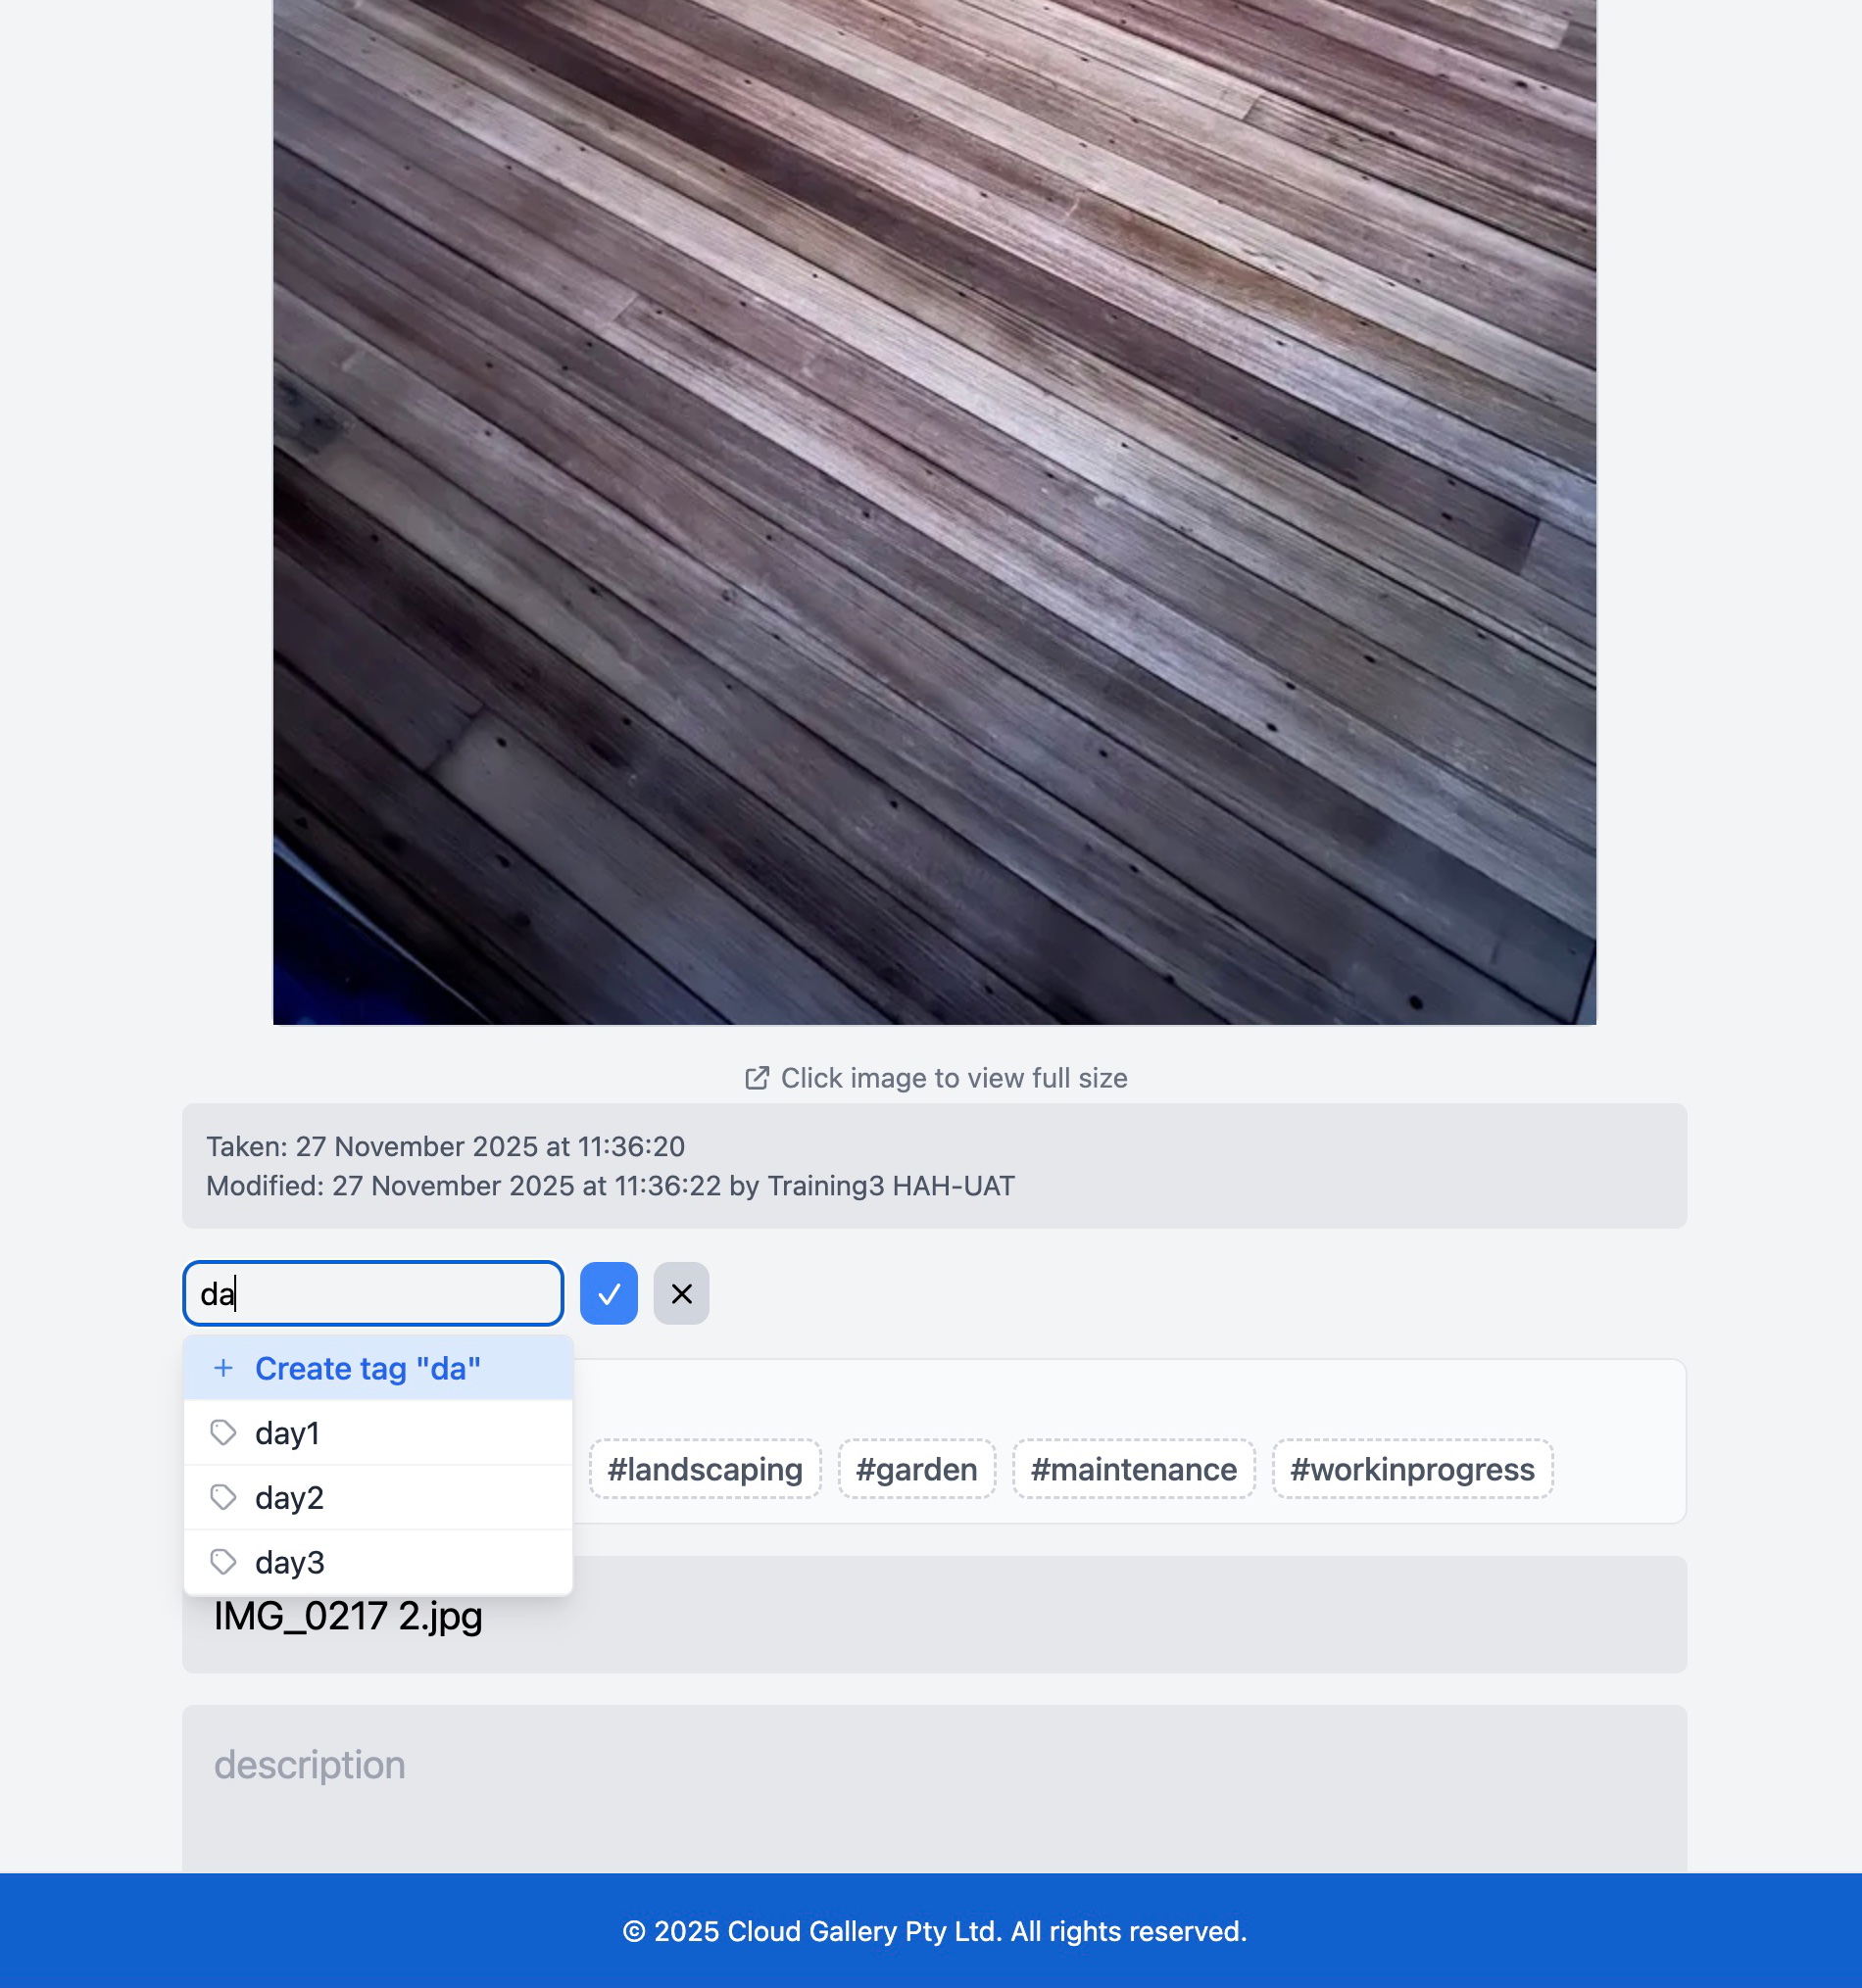
Autocomplete
As you type, Palixo suggests matching tags:
- Tags you've used before in this album
- Tags from your personal tag library
- Tap a suggestion to select it, or keep typing
Suggested Tags
When you open the camera, Palixo may show suggested tags based on:
- Tags commonly used in this album
- Your recently used tags
- Record related tags (when opened from Salesforce)
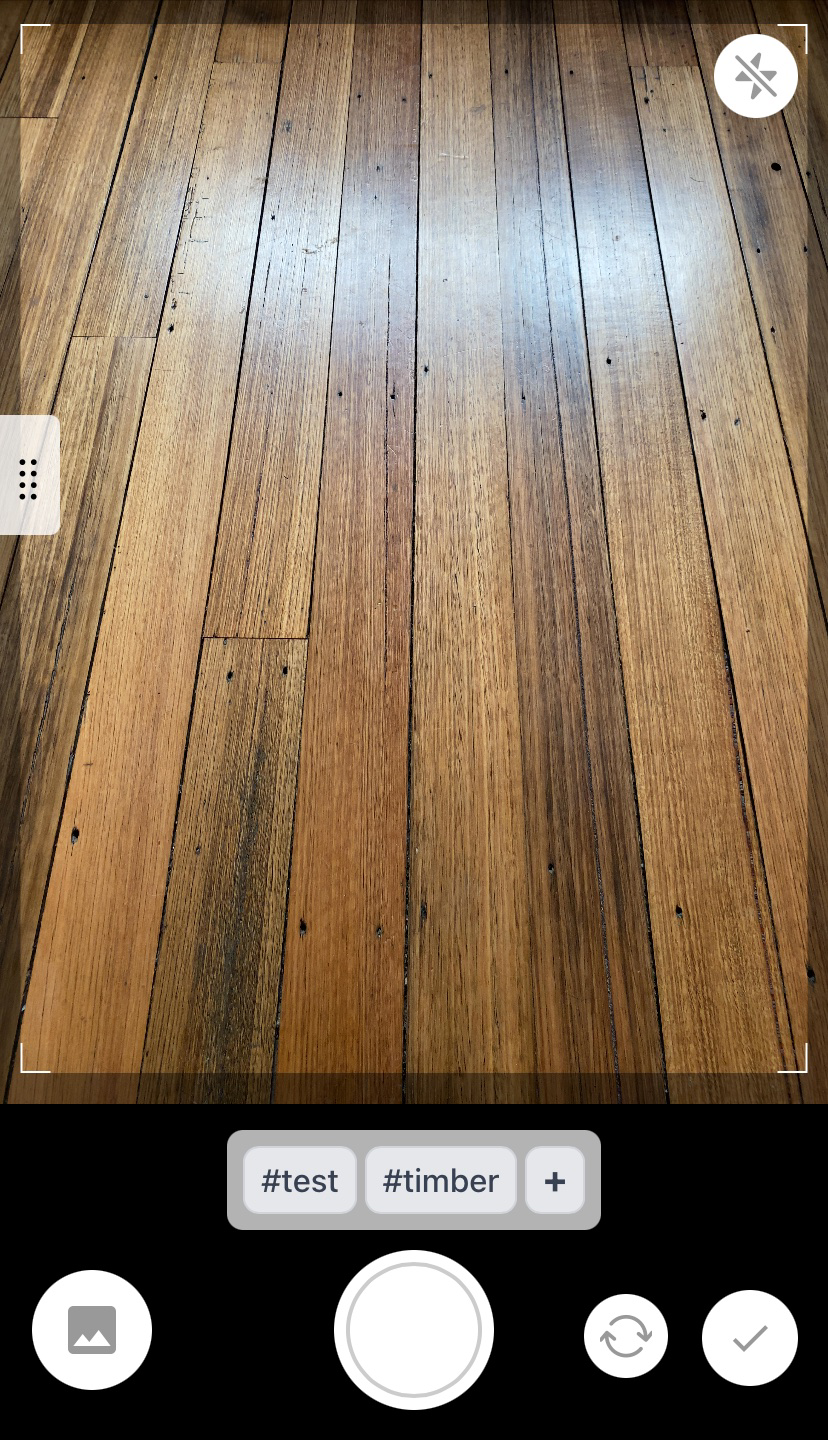
4.3 Capturing Photos
The camera interface is designed for quick, efficient photo capture.
Taking a Photo:
- Ensure your tags are set in the tag bar at the bottom
- Frame your shot in the viewfinder
- Tap the white circular capture button
- The screen briefly flashes and a thumbnail appears in the sidebar
- Continue taking more photos — they all receive the same tags
Camera Controls:
- Capture button — The large white circle takes the photo
- Camera switch (mobile only) — Toggles between front and rear cameras
- Done button — Returns to the album view
- Thumbnail sidebar — Shows recently captured photos; tap to view details

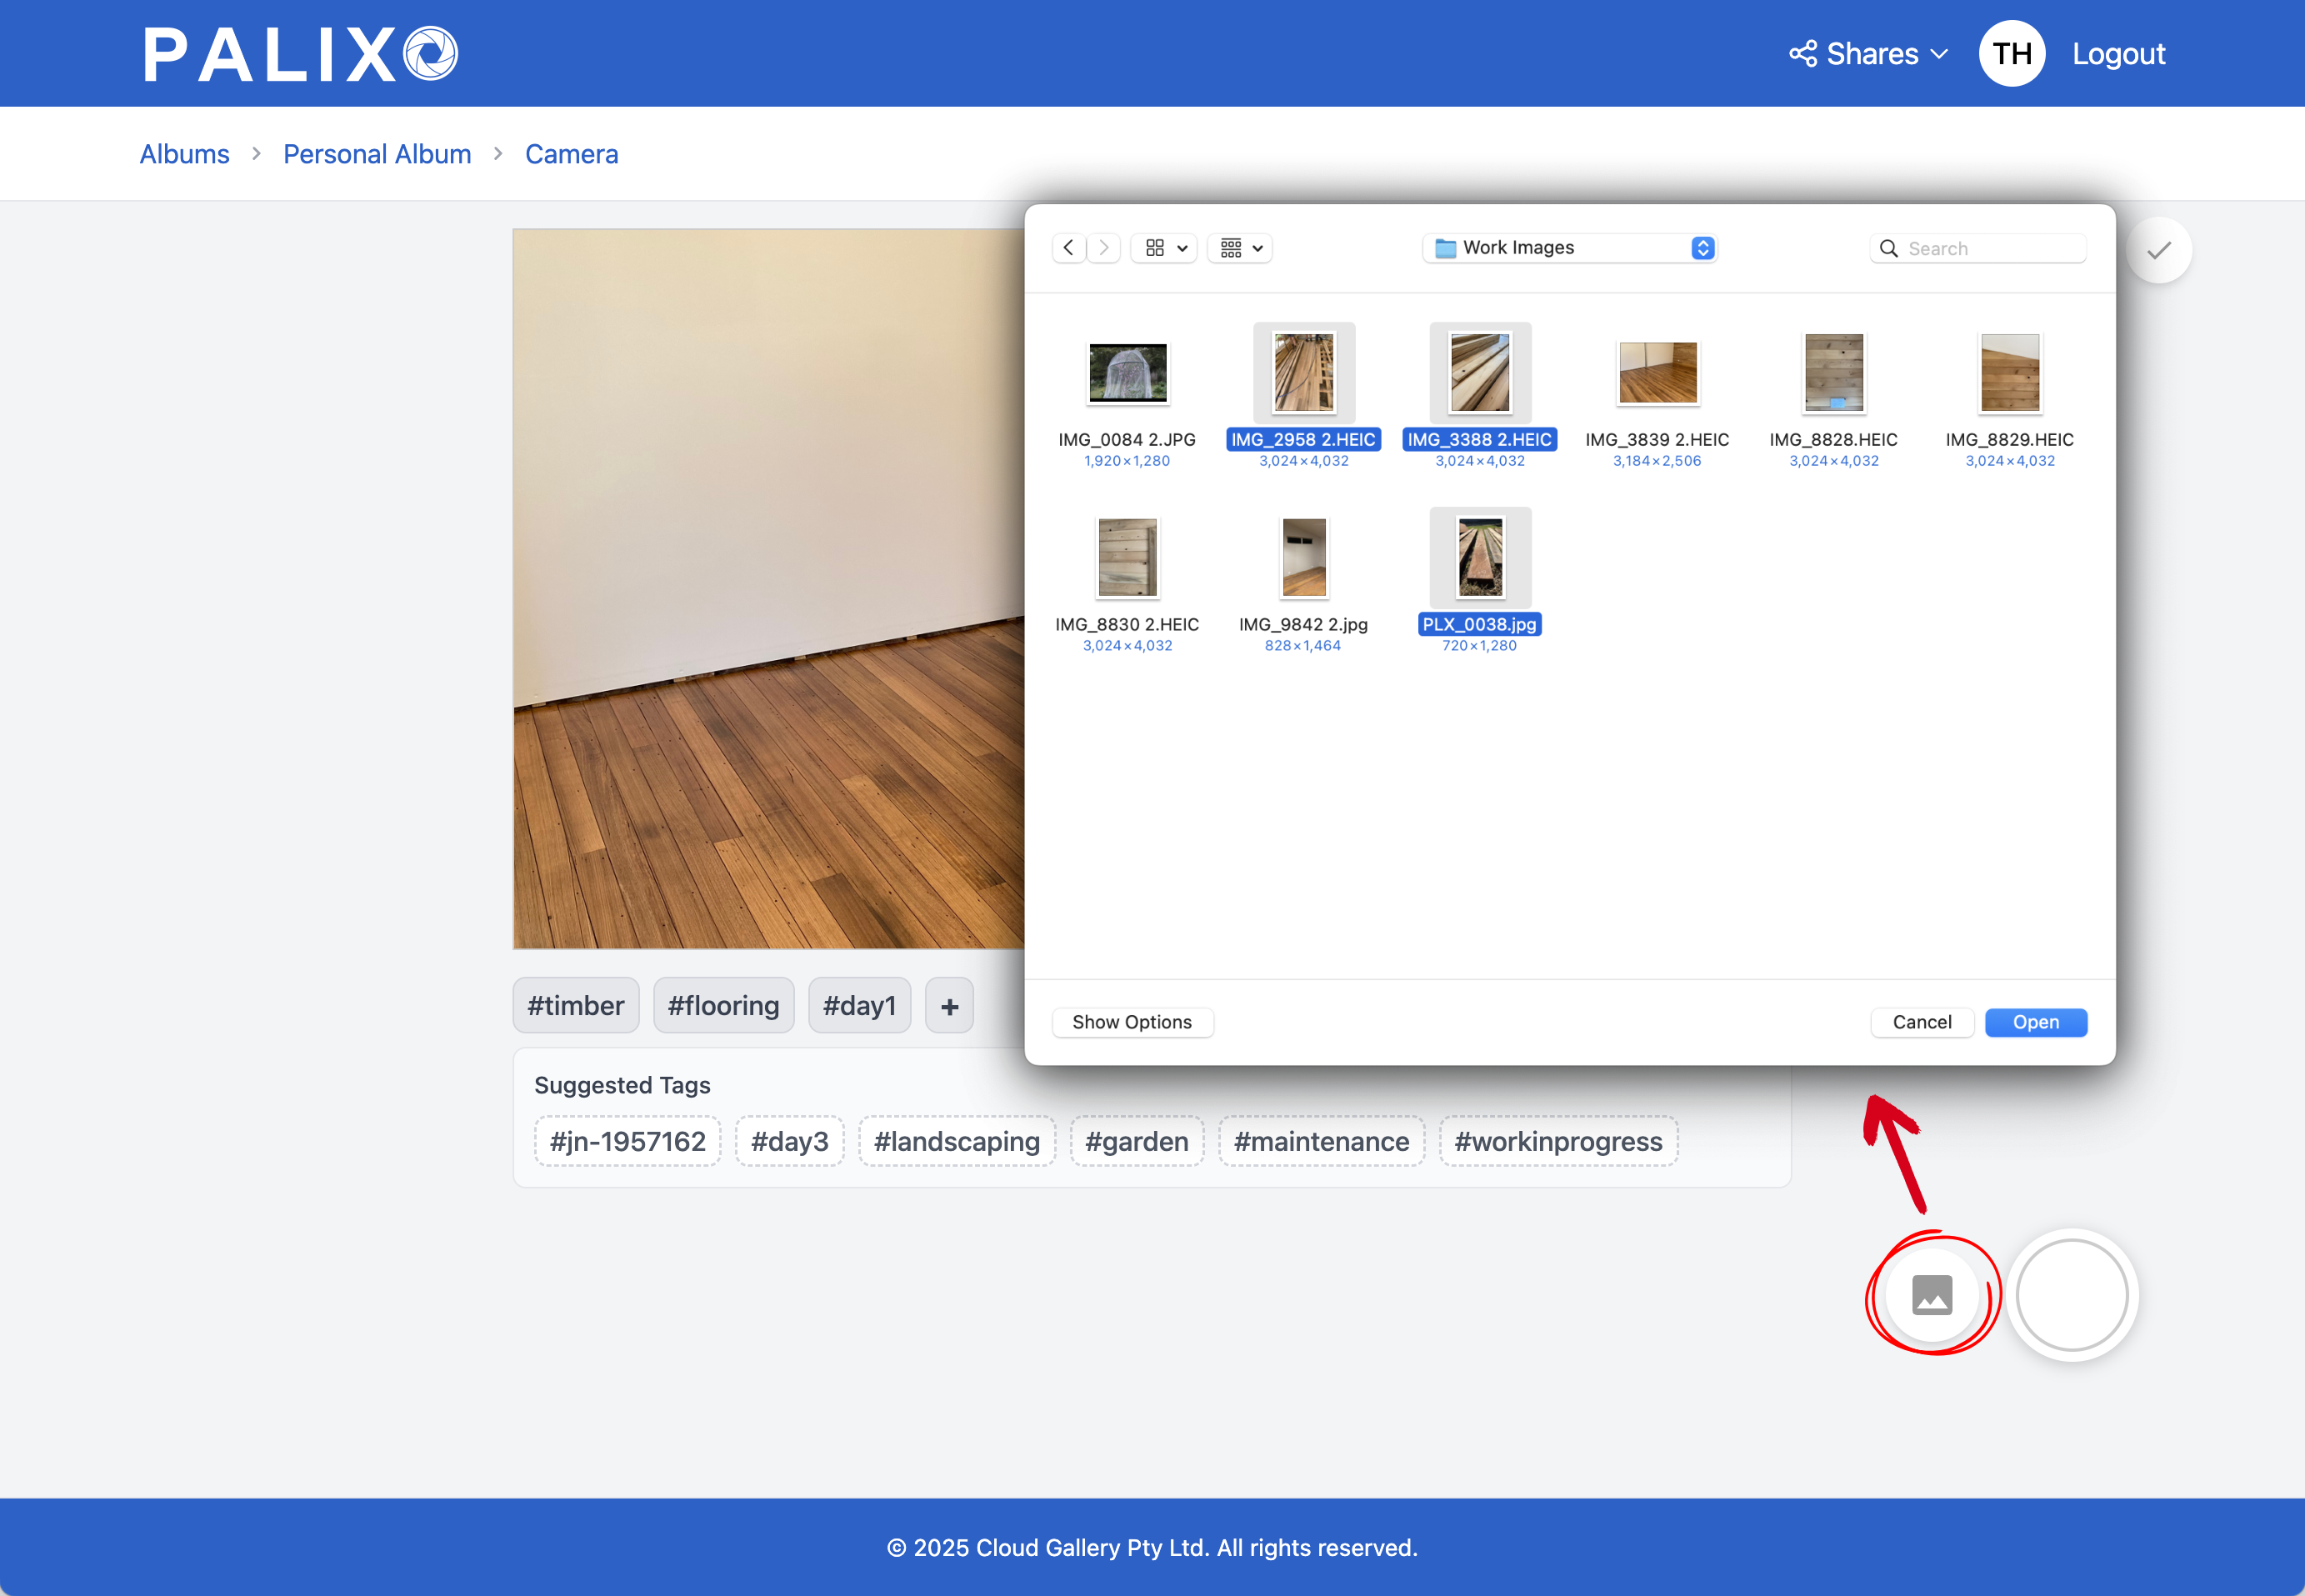
4.4 Uploading Photos From Your Device
You can upload existing photos from your device's gallery:
On Desktop:
- In the album view, click the + button to open the camera
- Add tags to the photos
- Click the image gallery icon next to the capture button
- Select one or more photos from your computer
- Photos are uploaded automatically
On Mobile:
- Tap the + button to open the camera
- Add tags
- Tap the gallery icon (image icon on the left)
- Select photos from your device's photo library
- Photos are uploaded automatically on confirmation
Supported File Types:
- JPEG (.jpg, .jpeg)
- PNG (.png)
- HEIC (.heic) — iPhone photos are automatically converted to .jpg
4.5 Capturing Photos Offline
4.6 Adding Photos from a Record in Salesforce (Desktop)
When working in Salesforce, you can capture photos directly from a record:
- Open the record in Salesforce
- Click the Cloud Images tab in the side panel or related items
- Click Take Photos or the camera icon
- The Palixo camera opens in a new tab
- The admin defined field is automatically added as a tag
- Take your photos as normal
- Click Done when finished — you're returned to Salesforce
Automatic Tagging:
When you open the camera from Salesforce, Palixo automatically:
- Selects the appropriate Work album
- Adds the admin defined field as a tag
- Adds any other contextual tags from the record
This ensures all photos taken from a specific record are easily searchable.

4.7 Adding Photos from a Record in Salesforce Mobile
On Salesforce Mobile, the workflow is similar:
- Open the record in the Salesforce mobile app
- Find the Palixo action (may be in the Quick Actions menu)
- Tap to open the Palixo camera
- The relevant tags are pre-populated
- Take photos and tap Done
- Return to Salesforce — photos are visible immediately
Viewing Photos:
From the same record, you can view all photos with the same tags by tapping the View Photos option.
4.8 Upload Guidelines & File Types
To ensure the best experience, follow these guidelines:
Supported File Types:
| Format | Extension | Notes |
|---|---|---|
| JPEG | .jpg, .jpeg | Recommended for most photos |
| PNG | .png | Good for screenshots or graphics |
| HEIC | .heic, .heif | iPhone format, automatically converted |
Recommended Photo Guidelines:
- Maximum file size: 10MB per photo
- Recommended resolution: Up to 4000 x 3000 pixels
- Minimum resolution: 100 x 100 pixels
What to Avoid:
- Very large files (over 10MB) may fail to upload
- Corrupted or partially downloaded images
- Non-image files (PDFs, videos, etc.)
5. Editing & Managing Photos
Once your photos are in Palixo, you can view, edit, and manage them easily.
5.1 Searching Your Photos by Tags
Tags are the primary way to find photos in Palixo.
Using the Search Bar:
- Click in the search box at the top of the album view
- Start typing a tag name
- Matching tags appear as suggestions
- Select a tag to filter photos
- Only photos with that tag are displayed
Clicking Tag Pills:
- When viewing photos, tags appear as clickable pills
- Click any tag to filter the album to show all photos with that tag
- Multiple tags can be active — photos must match ALL active tags
Removing a Filter:
- Click the X on a tag pill to remove it from the filter
- Or click Clear All to remove all filters

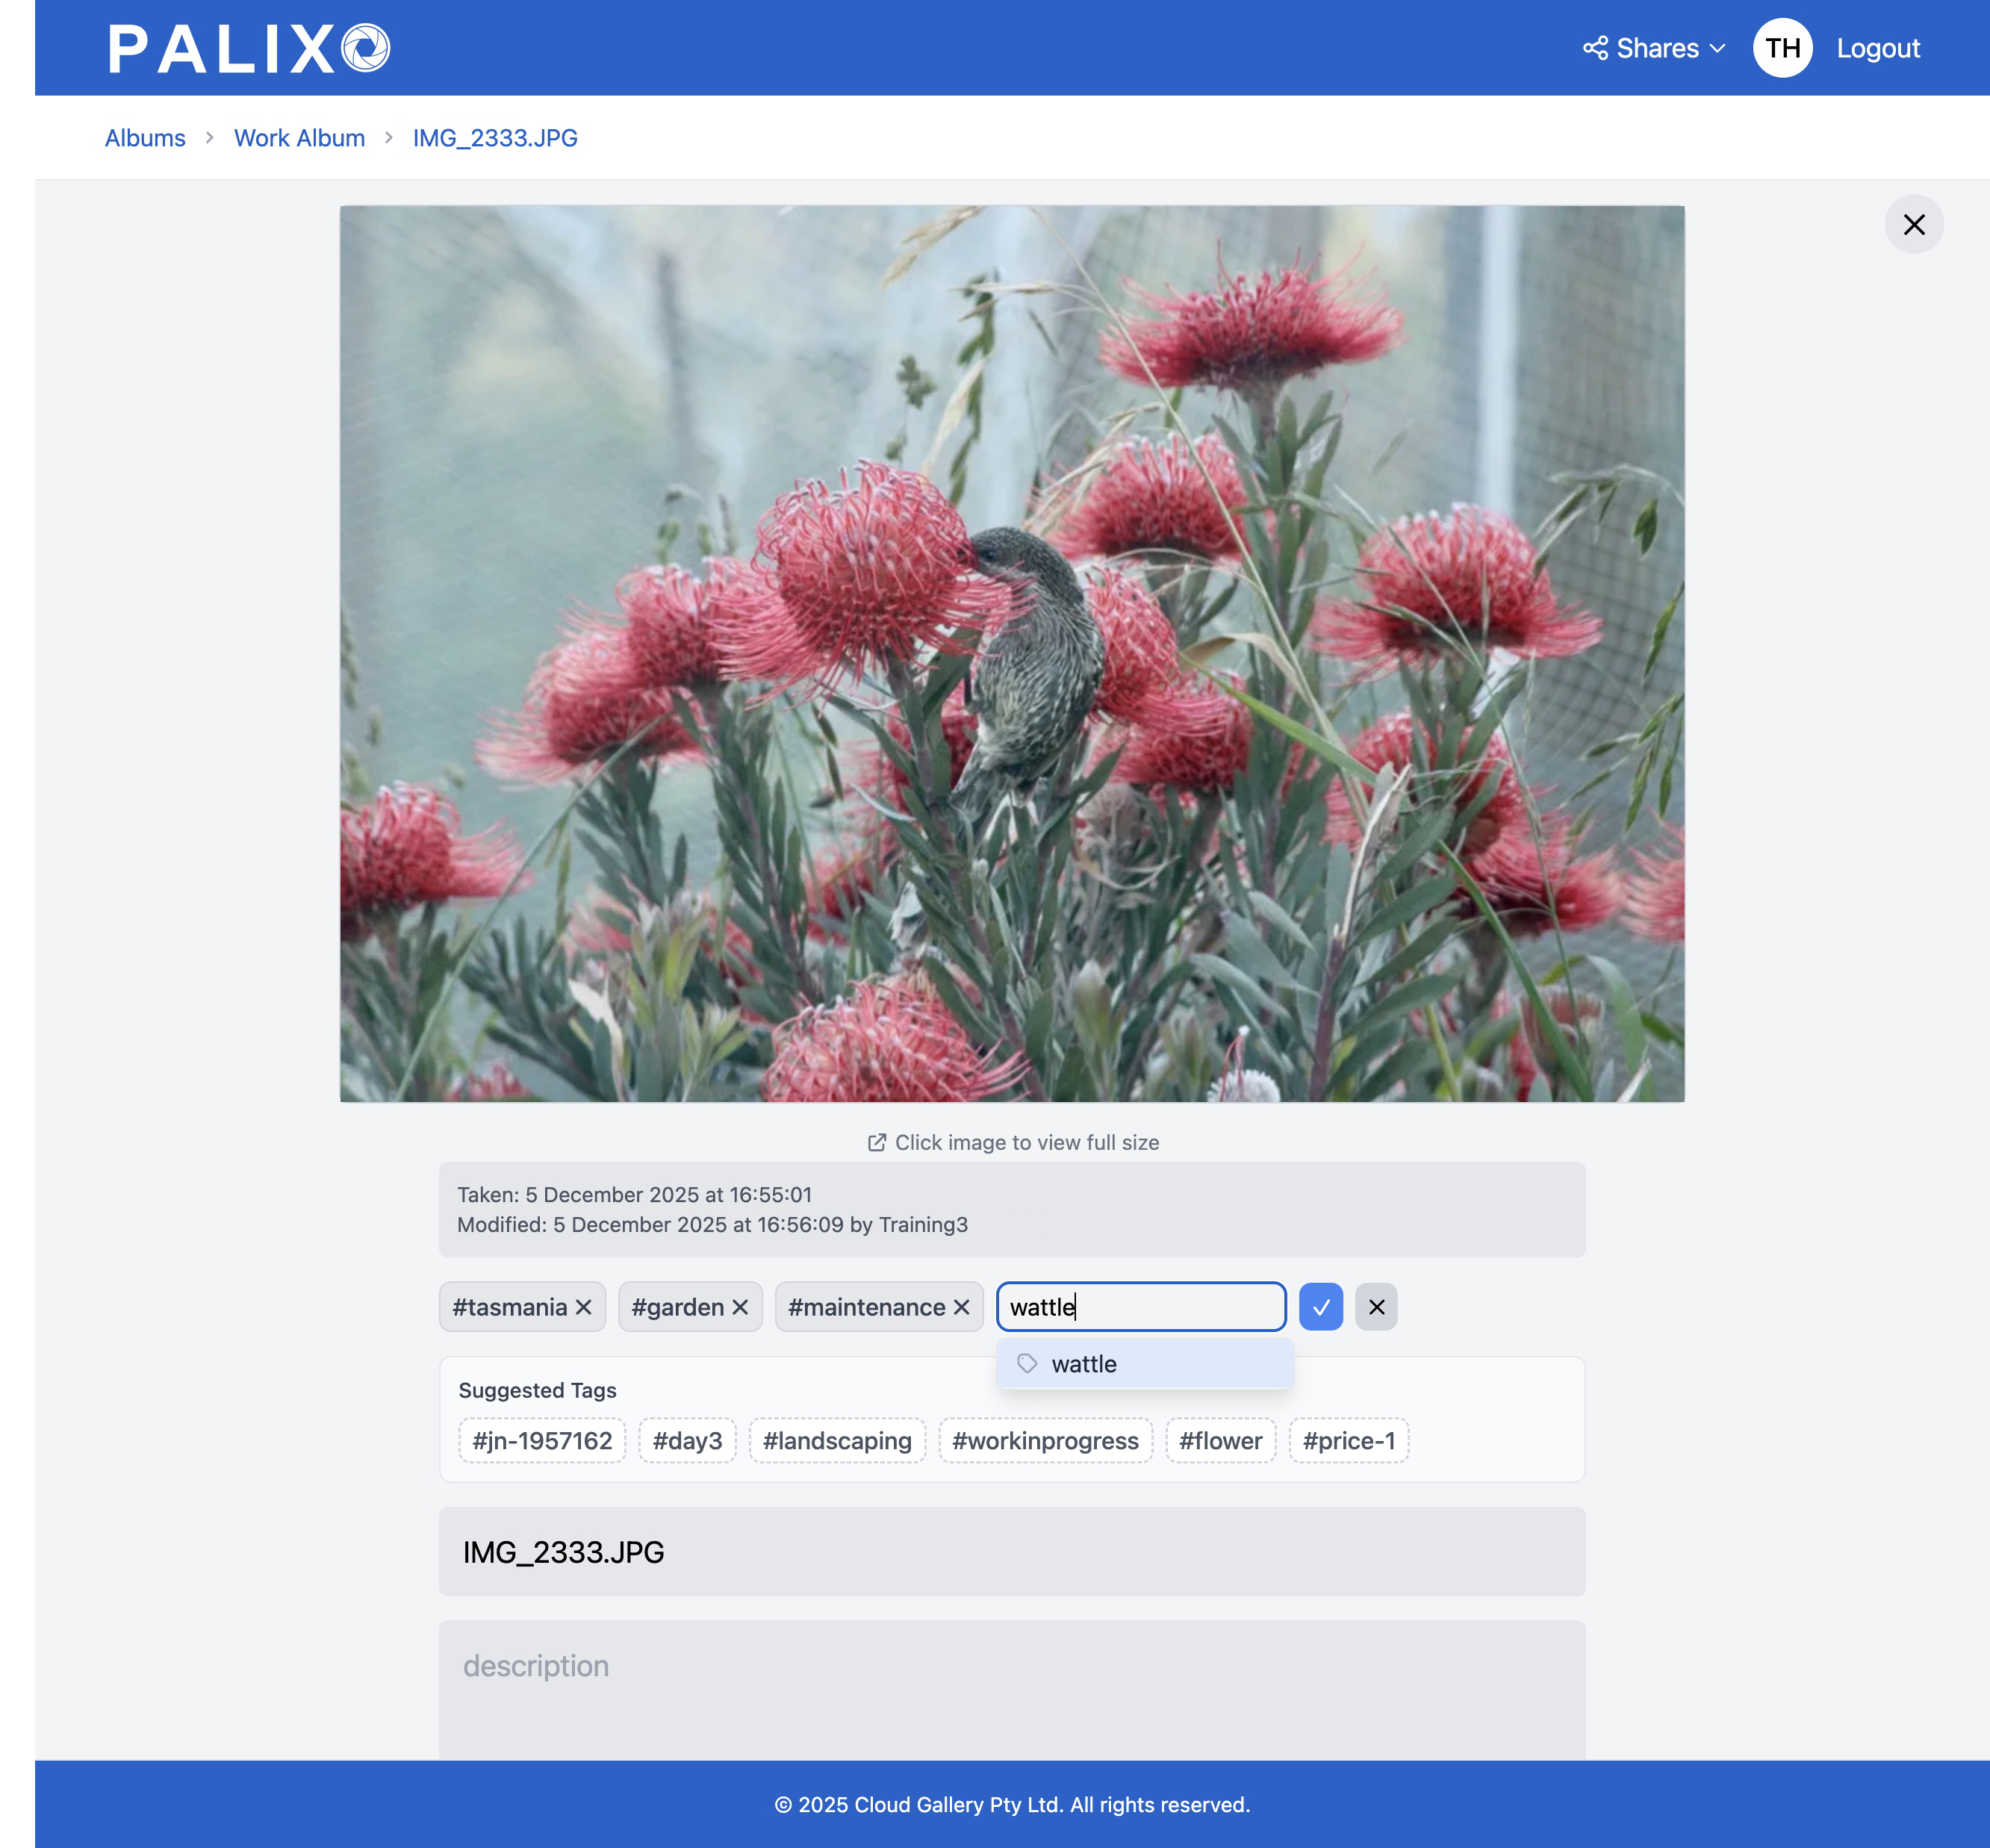
5.2 Edit Tags on a Single Photo
To add or remove tags from an individual photo:
- Click on a photo to open the detail view
- Find the Tags section below the image
- To add a tag: Type in the tag input field and press the Tick button or Enter
- To remove a tag: Click the X on the tag you want to remove
- Changes save automatically — no save button needed
5.3 Edit the Name and Description of a Photo
Each photo can have a name and description for additional context:
- Open the photo by clicking on it
- Find the Name and Description fields
- Click on either field to edit
- Type your changes
- Changes save automatically when you click away from the field
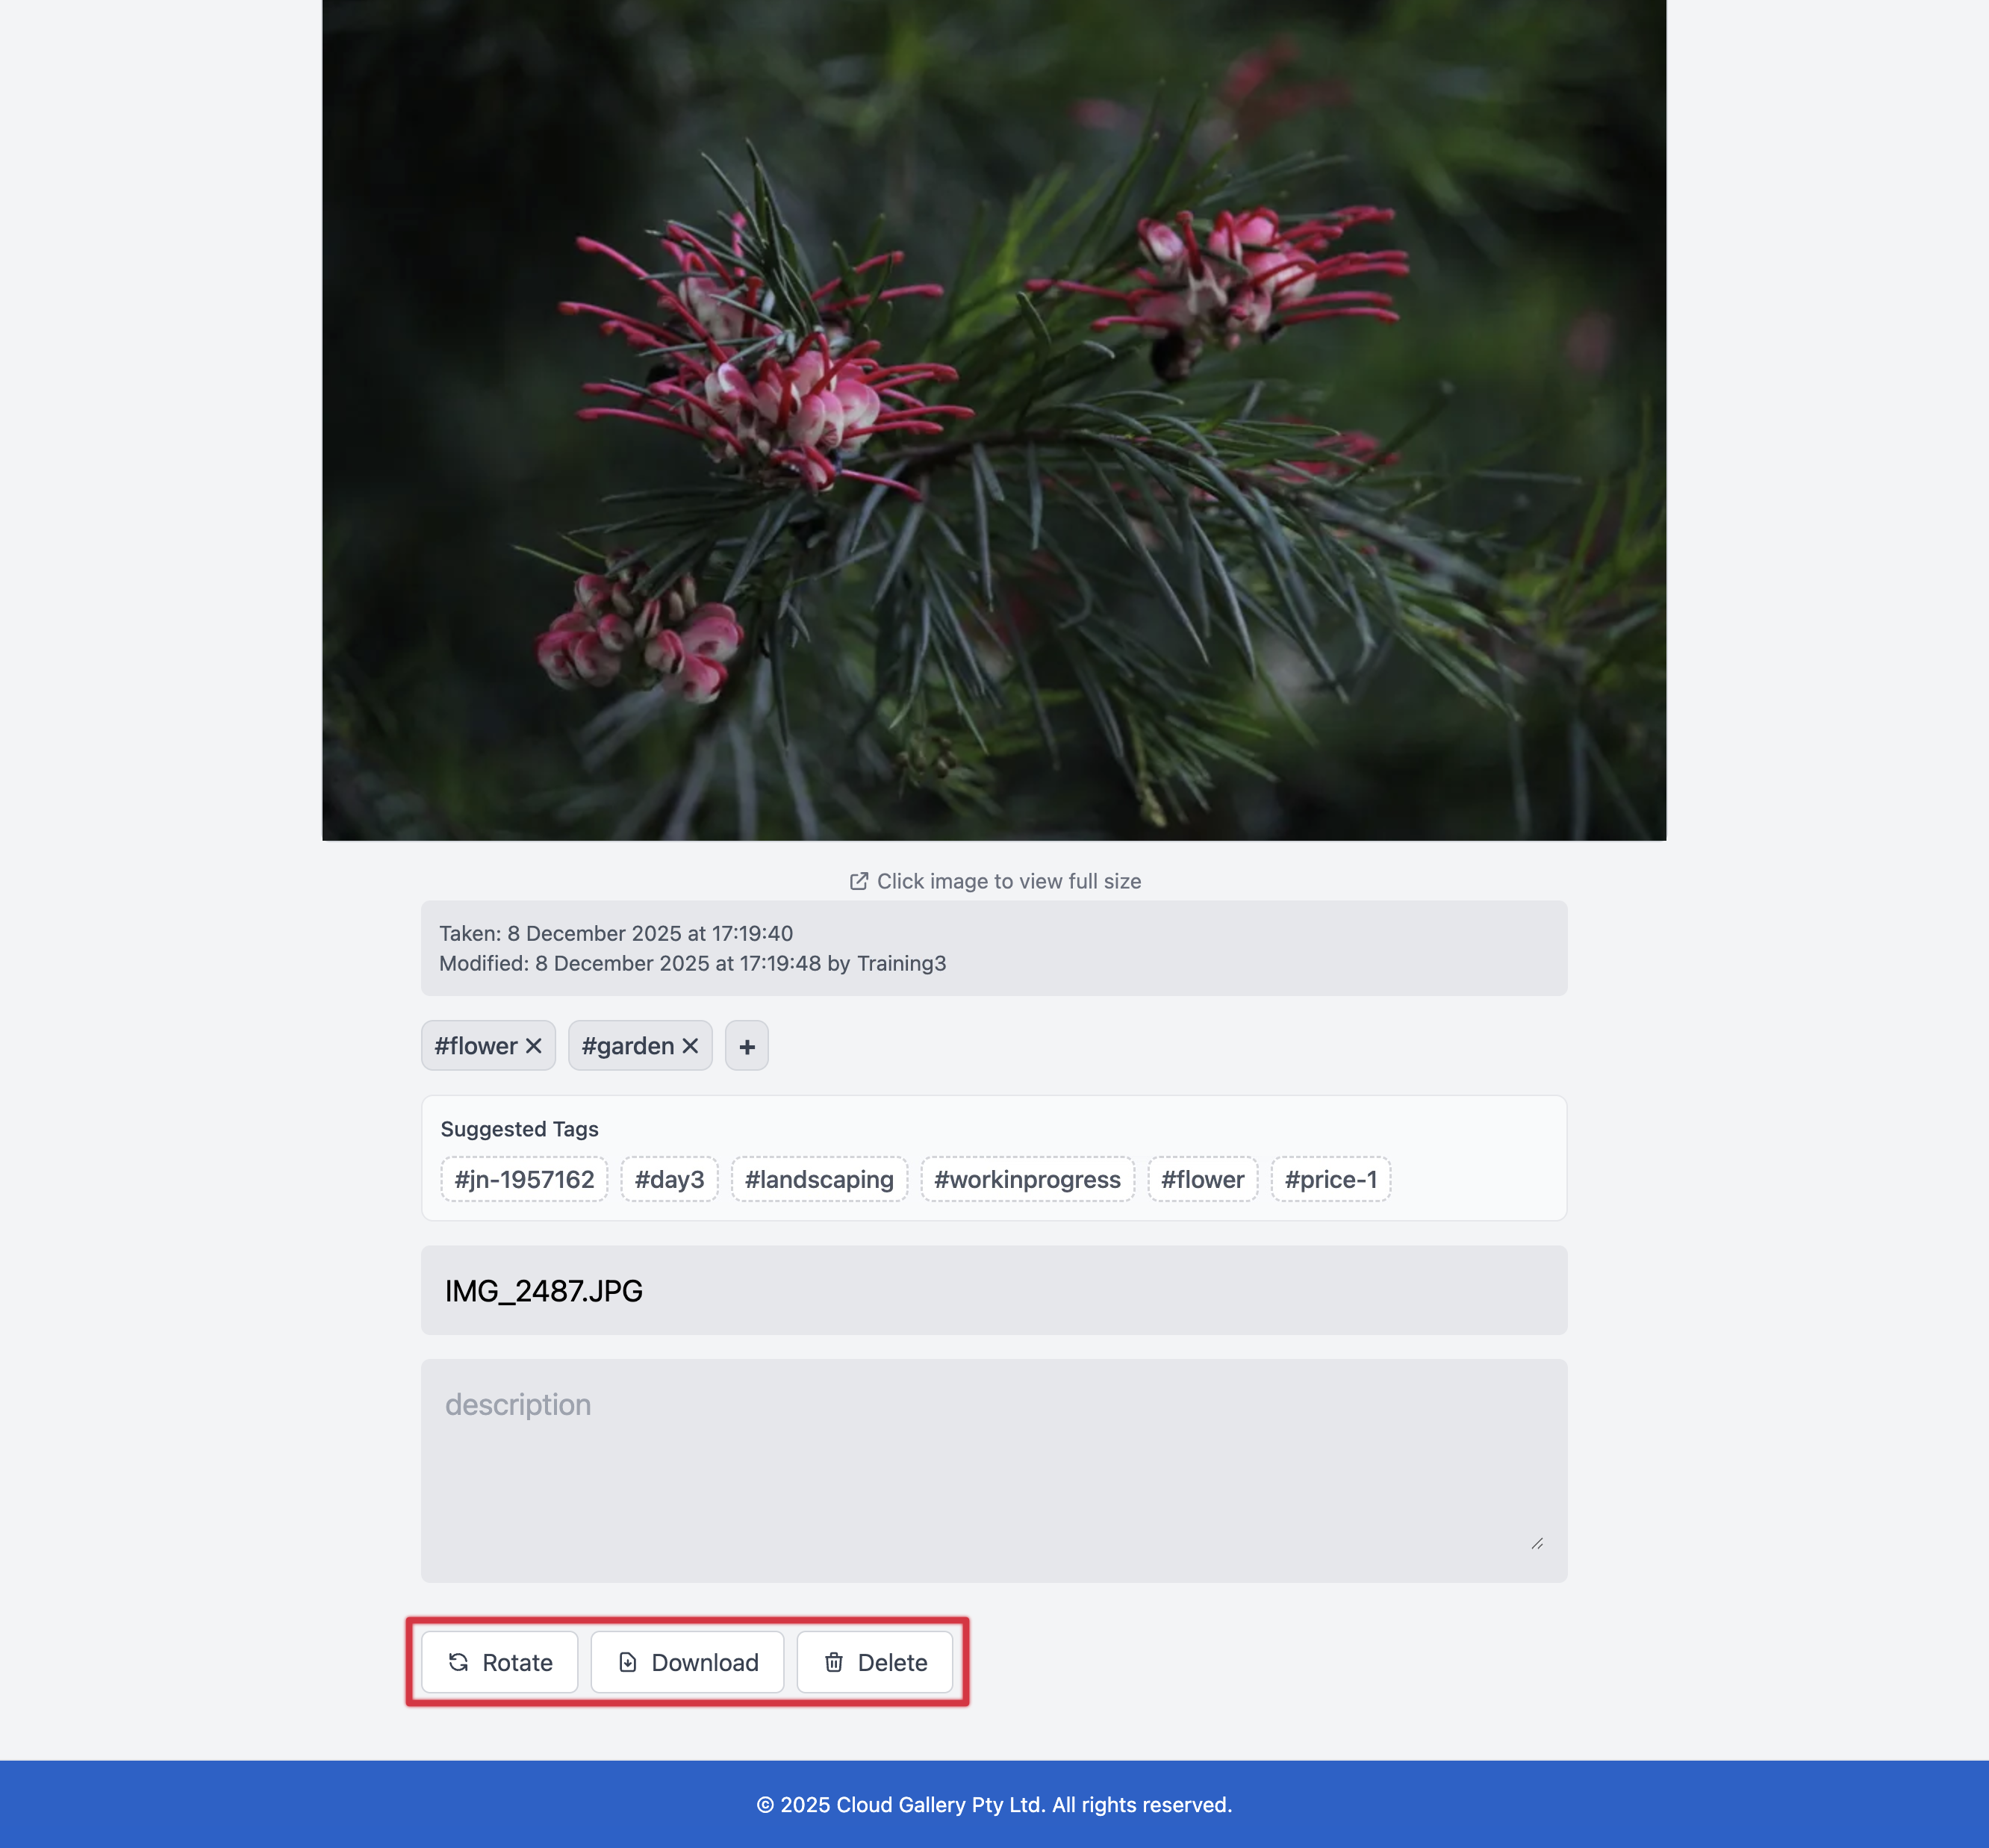
5.4 Rotate, Download and Delete a Photo
Rotate:
- Open the photo detail view
- Click the Rotate button (circular arrow icon)
- The photo rotates 90 degrees clockwise
- Click again to continue rotating
Download:
- Open the photo detail view
- Click the Download button (down arrow icon)
- The full-resolution photo downloads to your device
Delete:
- Open the photo detail view
- Click the Delete button (bin icon)
- Confirm the deletion when prompted
- The photo is permanently removed
Keyboard Shortcuts (Desktop):
| Action | Windows/Linux | Mac |
|---|---|---|
| Rotate | Ctrl + R | Cmd + R |
| Download | Ctrl + D | Cmd + D |
| Delete | Ctrl + X | Cmd + X |
| Close/Back | Escape | Escape |
6. Bulk Actions
When you need to manage multiple photos at once, bulk actions save significant time.
6.1 Introduction to Bulk Actions
Bulk actions allow you to:
- Rotate multiple photos
- Download multiple photos as a ZIP file
- Delete multiple photos
- Add or remove tags from multiple photos
- Edit names and descriptions across photos
Who Can Use Bulk Actions:
| Action | Viewer | Contributor | Admin | Owner |
|---|---|---|---|---|
| Select photos | No | Yes | Yes | Yes |
| Rotate | No | Yes | Yes | Yes |
| Add tags | No | Yes | Yes | Yes |
| Remove tags | No | No | Yes | Yes |
| Delete | No | No | Yes | Yes |
| Edit name/description | No | Yes | Yes | Yes |
Keyboard Shortcuts (Desktop)
When photos are selected, you can use keyboard shortcuts for quick actions:
| Action | Windows/Linux | Mac |
|---|---|---|
| Rotate selected | Ctrl + R | Cmd + R |
| Delete selected | Ctrl + X | Cmd + X |
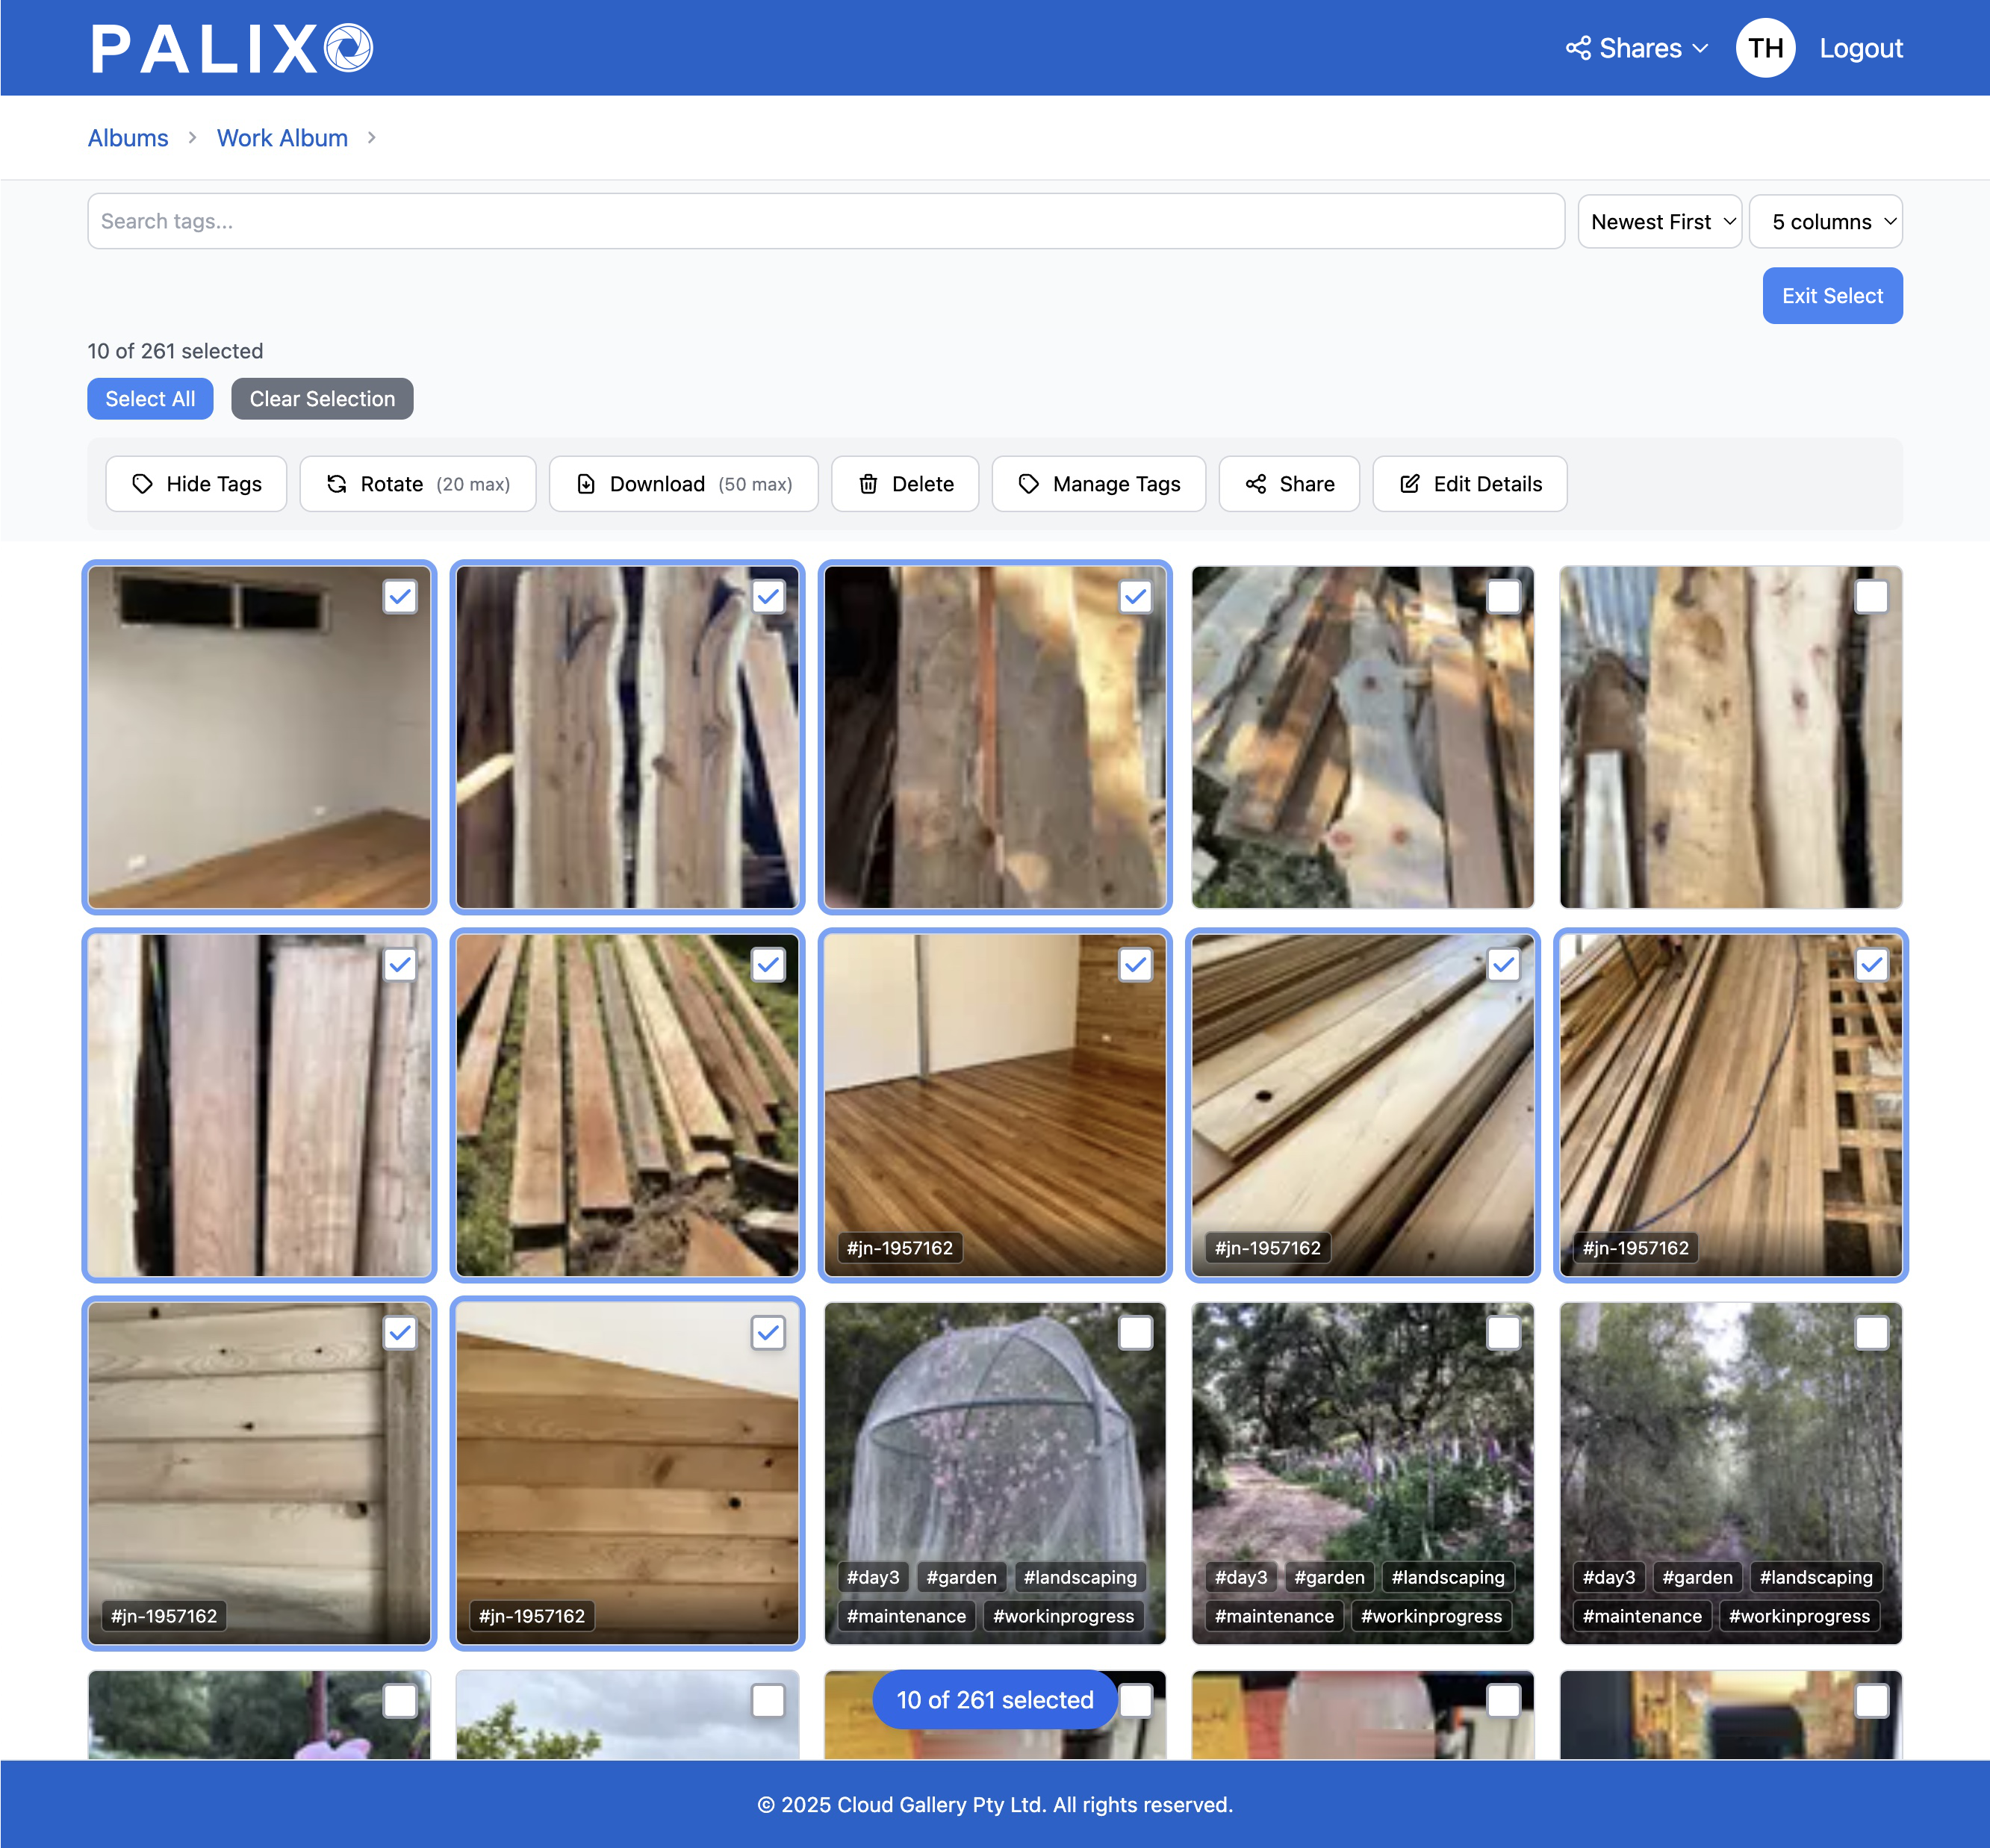
6.2 Select Photos to Bulk Manage
Entering Select Mode:
- Look for the Select button in the album toolbar
- Click it to enter select mode
- Each photo now shows a checkbox overlay
Selecting Photos:
- Individual selection: Click on photos to toggle their selection
- Click and drag (desktop): Draw a box around photos to select them
- Swipe across (mobile): Swipe your finger across multiple photos to select them
- Select All: Click Select All to select all currently visible photos
Selection Counter:
The toolbar shows how many photos are selected (e.g., "5 of 24 selected").
Exiting Select Mode:
- Press Escape on desktop
- Tap the Exit Select Mode option in the menu on mobile
- All selections are cleared when you exit
6.3 Bulk Rotate, Download and Delete
With photos selected:
Rotate:
- Click the Rotate button in the bulk actions toolbar
- All selected photos rotate 90 degrees clockwise
- A progress indicator shows for large batches
Download:
- Click the Download button
- Selected photos are packaged into a ZIP file
- The ZIP file downloads to your device
Delete:
- Click the Delete button
- A confirmation dialog appears showing how many photos will be deleted
- Click Confirm to permanently delete
- Or click Cancel to keep the photos
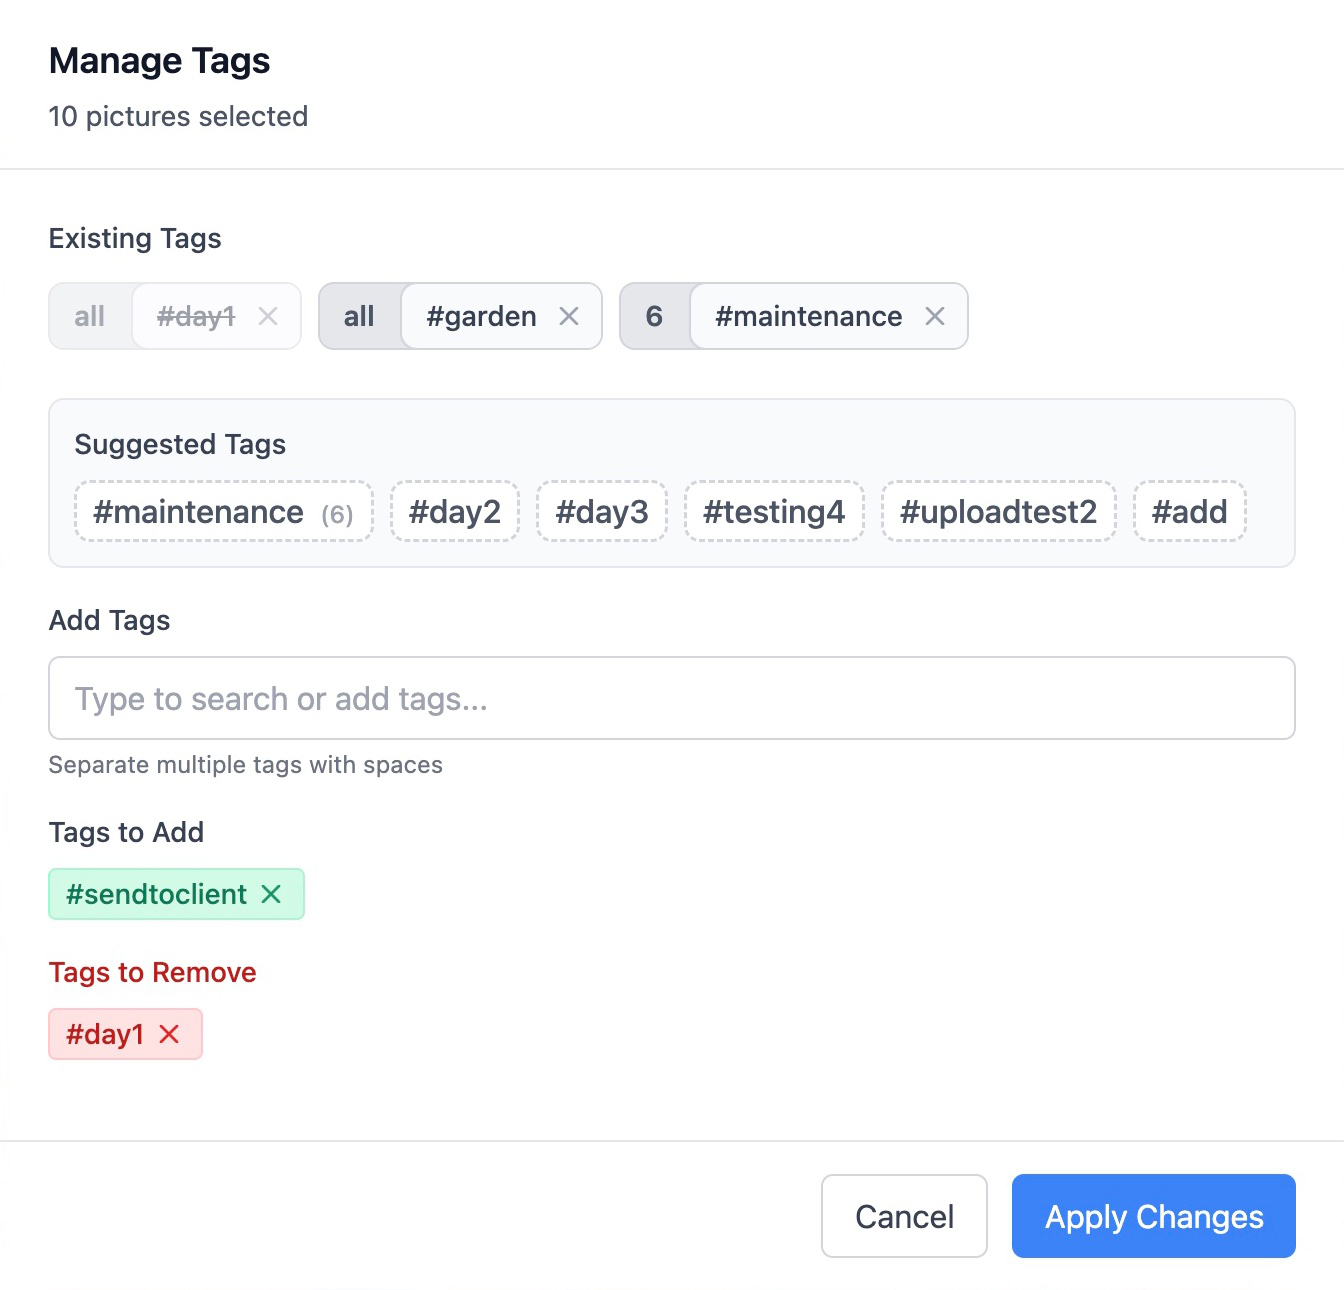
6.4 Bulk Manage Tags
The tag management modal provides powerful tools for managing tags across multiple photos:
- Select your photos and click Manage Tags
- The tag management modal opens
Viewing Existing Tags:
- All tags used by any selected photo are displayed
- Tags show a count indicator (e.g., "5" means 5 of your selected photos have this tag)
- Tags are sorted by frequency (most common first)
Removing a Tag:
- Click the X on any tag to remove it from ALL selected photos
- Only Admins and Owners can remove tags in bulk
Adding Tags:
- Type new tags in the input field
- Press Space to confirm each tag
- Tags are added to ALL selected photos
- Duplicate tags are automatically skipped (no error shown)
Applying Changes:
- Click Apply to save your changes
- Click Cancel to discard changes
6.5 Bulk Edit Details
To edit names and descriptions for multiple photos:
- Select photos and click Edit Details
- The edit modal appears with two fields:
- Name — Enter a name to apply to ALL selected photos
- Description — Enter text to APPEND to existing descriptions
- Leave a field empty to skip updating it
- Click Apply to save changes
7. Managing Album Access for Other Users
Palixo provides two ways to share photos with others: Album Sharing and Collections. This section covers Album Sharing for team collaboration.
7.1 Album Sharing vs Collections: When to Use Which
Before sharing, understand which method suits your needs:
| Feature | Album Sharing | Collections |
|---|---|---|
| Best for | Ongoing collaboration with team members | Temporary sharing with external parties (e.g. clients) |
| Access duration | Permanent until revoked | Time-limited with configurable expiry |
| Recipients can | View, contribute, or administer (based on access level) | View only (optionally download) |
| Requires account | Yes — recipients need a Palixo account | No — anyone with the link can view |
| Update content | Photos automatically visible to all with access | Must edit the collection to change photos |
| Use when | Sharing with colleagues who need ongoing access | Sending photos to clients, suppliers, or one-time viewers |
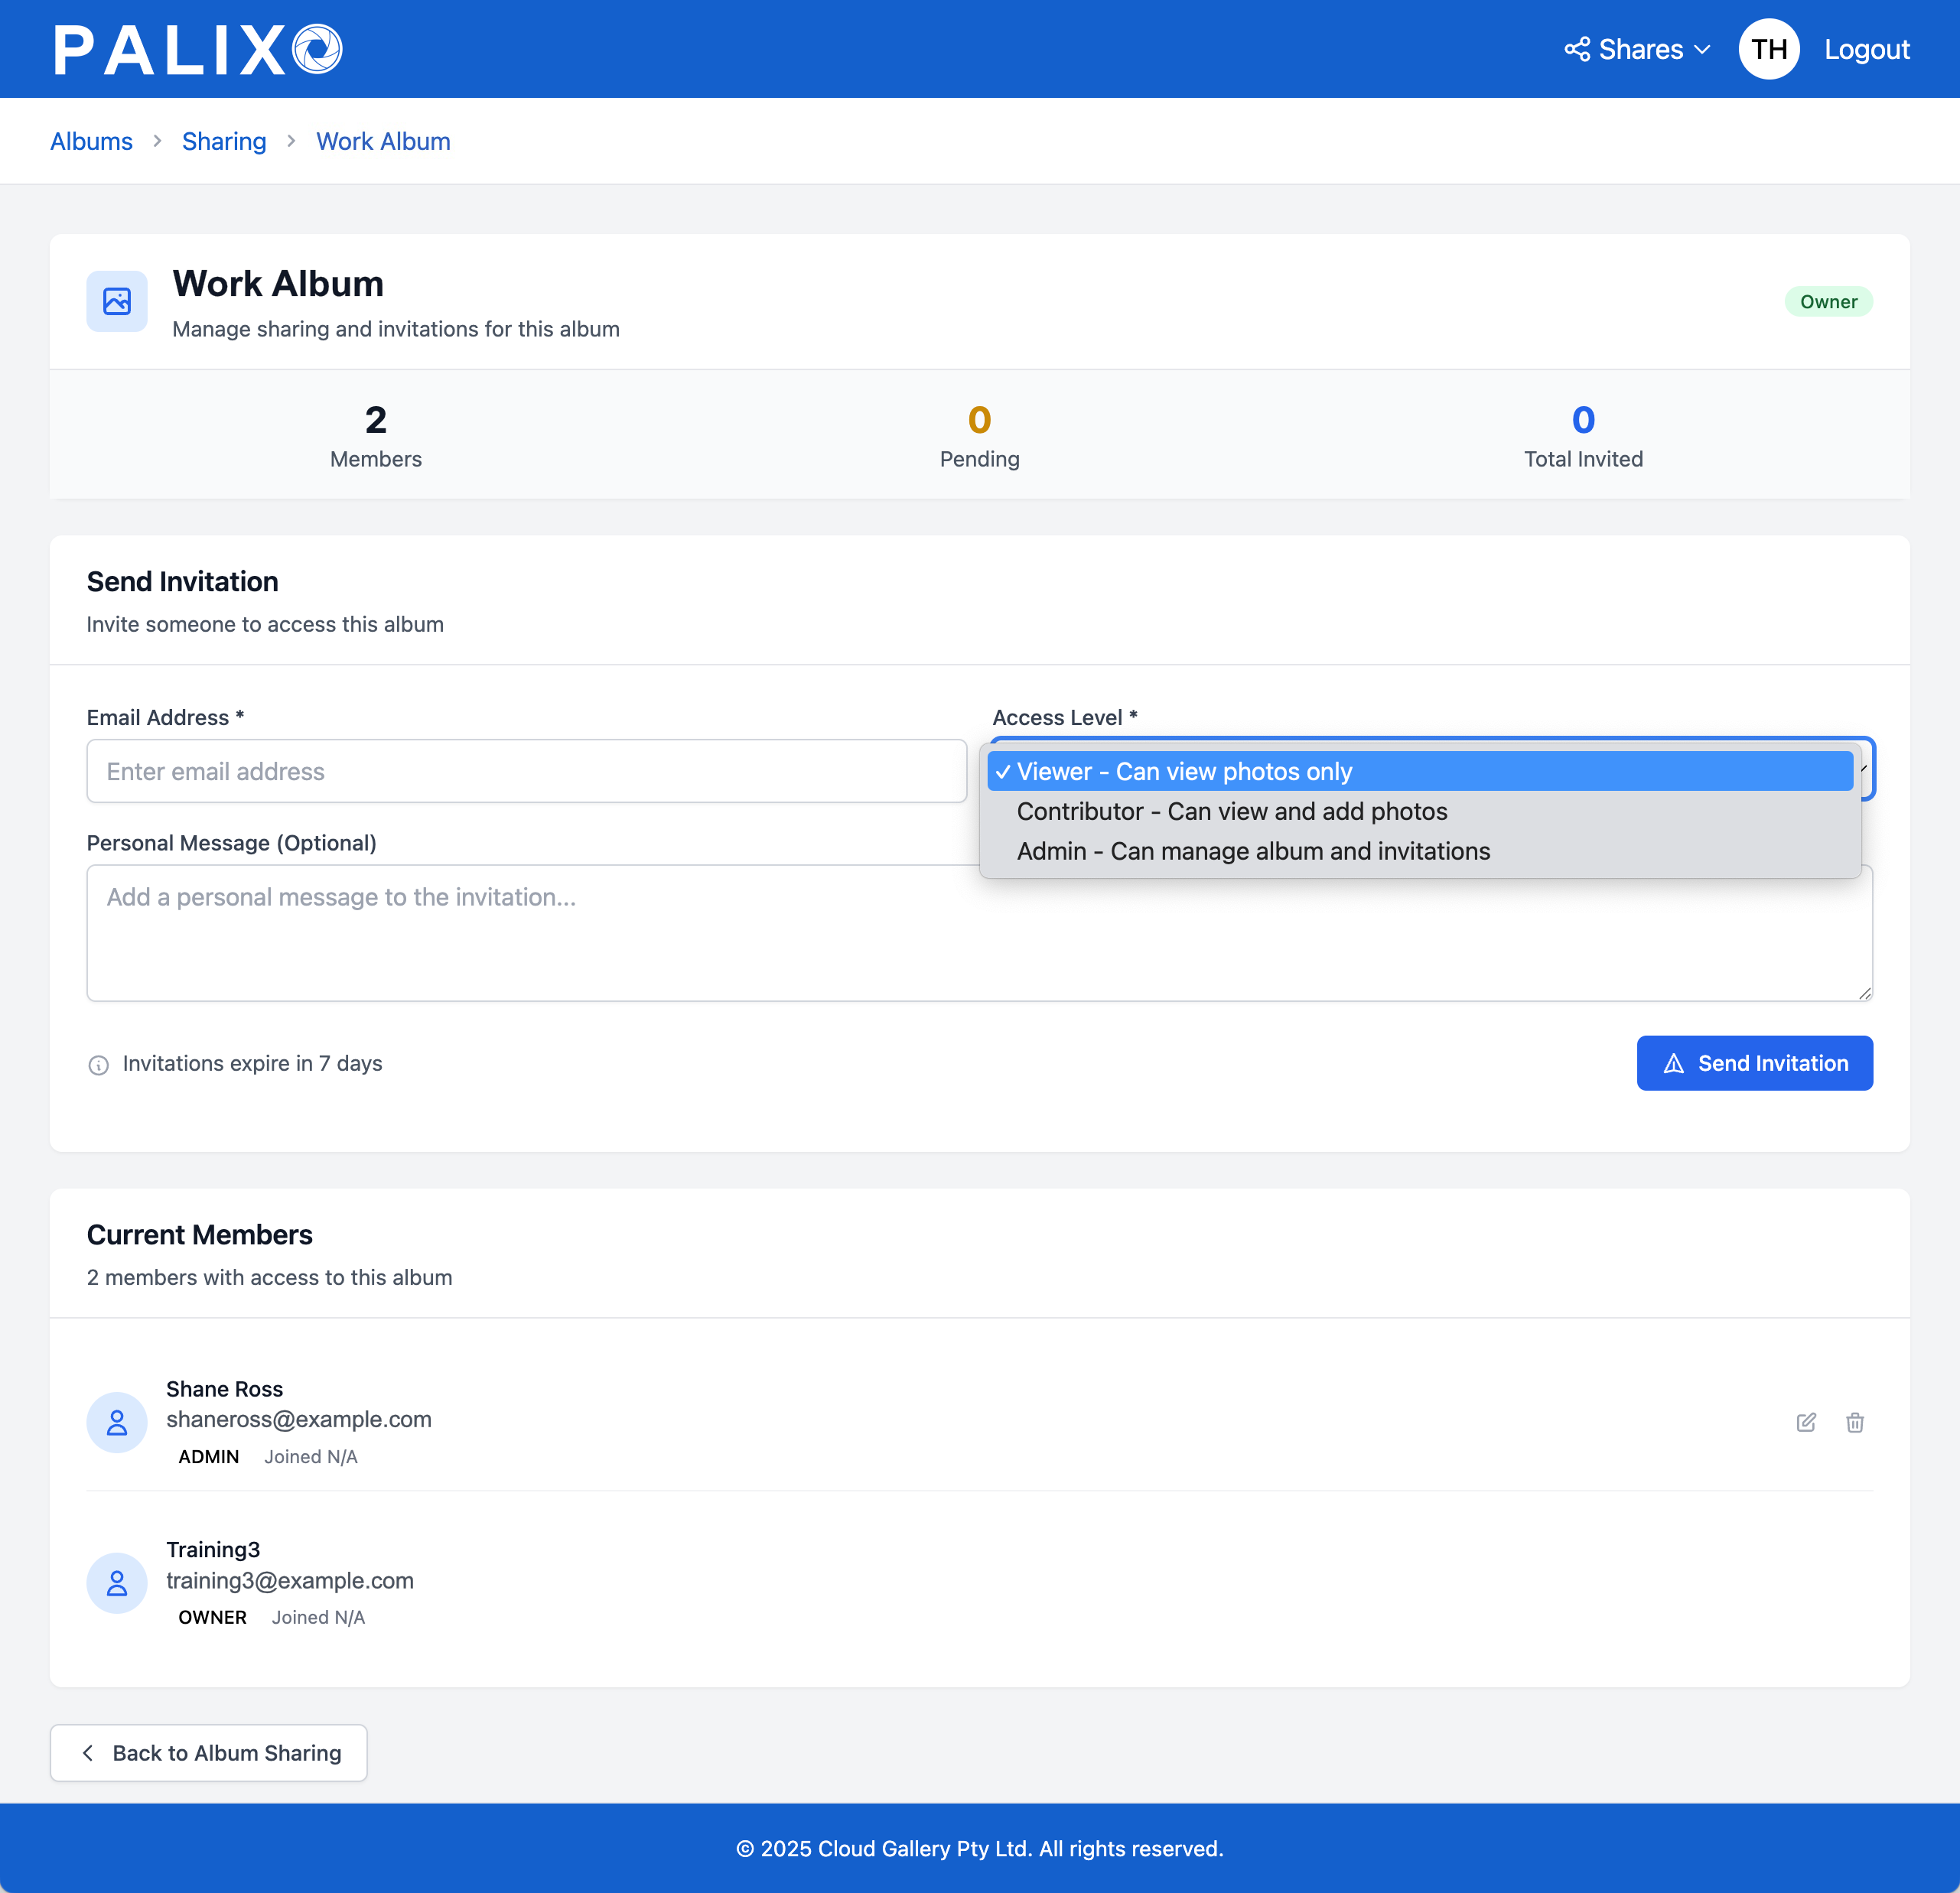
7.2 Album Sharing: Levels of Access
When you invite someone to an album, you choose their access level:
Viewer
- Can view all photos in the album
- Can download photos
- Cannot add, edit, or delete anything
Contributor
- Everything a Viewer can do, plus:
- Can take and upload new photos
- Can add tags to photos
- Cannot delete photos or remove tags
Administrator
- Everything a Contributor can do, plus:
- Can delete photos
- Can remove tags from photos
- Can edit photo names and descriptions
- Can invite others to the album
- Can change anyone's access level
- Can revoke access from anyone
Owner (not assignable — automatic)
- Same as Admin
7.3 Sending Invitations for Album Access
To invite someone to your album:
- Click the Shares dropdown in the header and select Albums
- Find the album you want to share (only albums you own or admin appear)
- Click Manage
- In the Invite Someone New section:
- Enter the person's email address
- Select their access level (Viewer, Contributor, or Administrator)
- Optionally add a personal message
- Click Send Invitation
The recipient receives an email with a link to accept the invitation.
7.4 Accepting Album Access Invitations
When you receive an album invitation:
- Open the email from Palixo
- Click the Accept Invitation button
- If you're not logged in, you'll be prompted to log in or create an account
- Once accepted, the album appears on your Home screen
- You're redirected to the album automatically
If You Don't Have an Account:
- Click the invitation link
- You'll be guided through creating a Palixo account
- After account creation, you'll automatically have access to the shared album
7.5 Revoking Album Access
Album owners and administrators can remove someone's access:
- Click the Shares dropdown in the header and select Albums
- Find and select the album
- In the Current Access section, find the person
- Click Remove next to their name
- Confirm the removal
The person immediately loses access and the album disappears from their Home screen.
Cancelling Pending Invitations:
If someone hasn't accepted yet:
- Find their entry in the Pending Invitations section
- Click Cancel to revoke the invitation
- The invitation link becomes invalid
8. Palixo in Salesforce
Palixo integrates deeply with Salesforce to provide seamless photo management for your records.
8.1 About Palixo in Salesforce
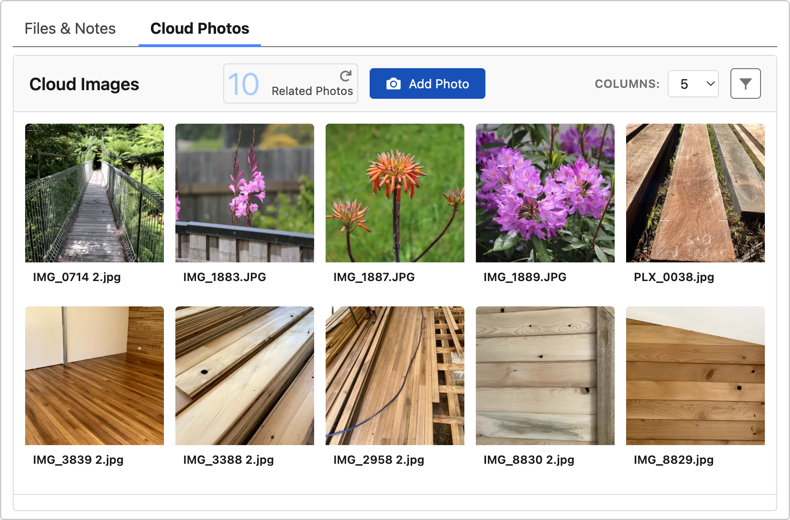
When Palixo is installed in your Salesforce org, you get:
Cloud Images Component
- Appears in the side panel or related tab on records (admin configured)
- Displays Palixo photos filtered by admin-defined static or dynamic tags
- Provides quick access to take new photos
- Allows filtering by additional tags
The Cloud Images component embeds Palixo content directly within Salesforce — there is no data synchronisation between the two systems. Photos are stored in Palixo and displayed in real-time within Salesforce.
8.2 Adding Photos from a Record in Salesforce (Desktop)
Taking photos directly from Salesforce ensures they're automatically associated with the right Record:
- Open the record you're working on
- Expand the Cloud Images panel in the sidebar
- Click the Take Photos button
- A new browser tab opens with the Palixo camera
- Notice the admin configured tag is already added
- Add any additional tags you need
- Take your photos
- Click Done when finished
What Happens Automatically:
- The correct Work album is selected
- The admin configured tag is added automatically (eg record.name)
- When you finish, photos are visible immediately in Salesforce
8.3 Adding Photos from a Record in Salesforce Mobile
On Salesforce Mobile, the workflow is similar:
- Open the record in the Salesforce mobile app
- Find the Palixo action (may be in the Quick Actions menu)
- Tap to open the Palixo camera
- The relevant tags are pre-populated
- Take photos and tap Done
- Return to Salesforce — photos are visible immediately
Viewing Photos:
From the same record, you can view all photos with the same tags by tapping the View Photos option.
8.4 Filtering Photos by Tags
When viewing the Cloud Images panel in Salesforce:
Initial View:
- Photos tagged with the current static or dynamic tag are displayed
- Additional relevant tags may be shown based on record data
Adding Filters:
- Click on any tag pill to add it to the filter
- Only photos matching ALL active tags are shown
- This is useful for finding specific types of photos (e.g., "before" photos for a job)
Removing Filters:
- Click the X on a tag to remove it
- Or click Clear Filters to show all related photos again
9. Emailing Photos From Salesforce
Palixo makes it easy to include photos in your Salesforce emails without large attachments.
9.1 About Sending Palixo Photos with Quote, Invoice and Work Order Email Senders
Traditional email attachments have significant limitations:
- Large files slow down email sending
- Attachments count against Salesforce storage quotas
- Some email servers block large attachments
Palixo solves these problems:
- No bulky attachments — Photos are hosted by Palixo and linked in the email
- Near instant send — Emails send immediately regardless of how many photos you include
- Professional presentation — Photos display in a clean, responsive strip layout
- Universal access — Anyone with the email can view the photos, even without a Palixo account
- Forwardable — Clients can forward emails and recipients still see all photos
9.2 Salesforce Email Templates
To include Palixo photos in emails, add the Palixo merge field to your email template.
The Palixo Merge Field:
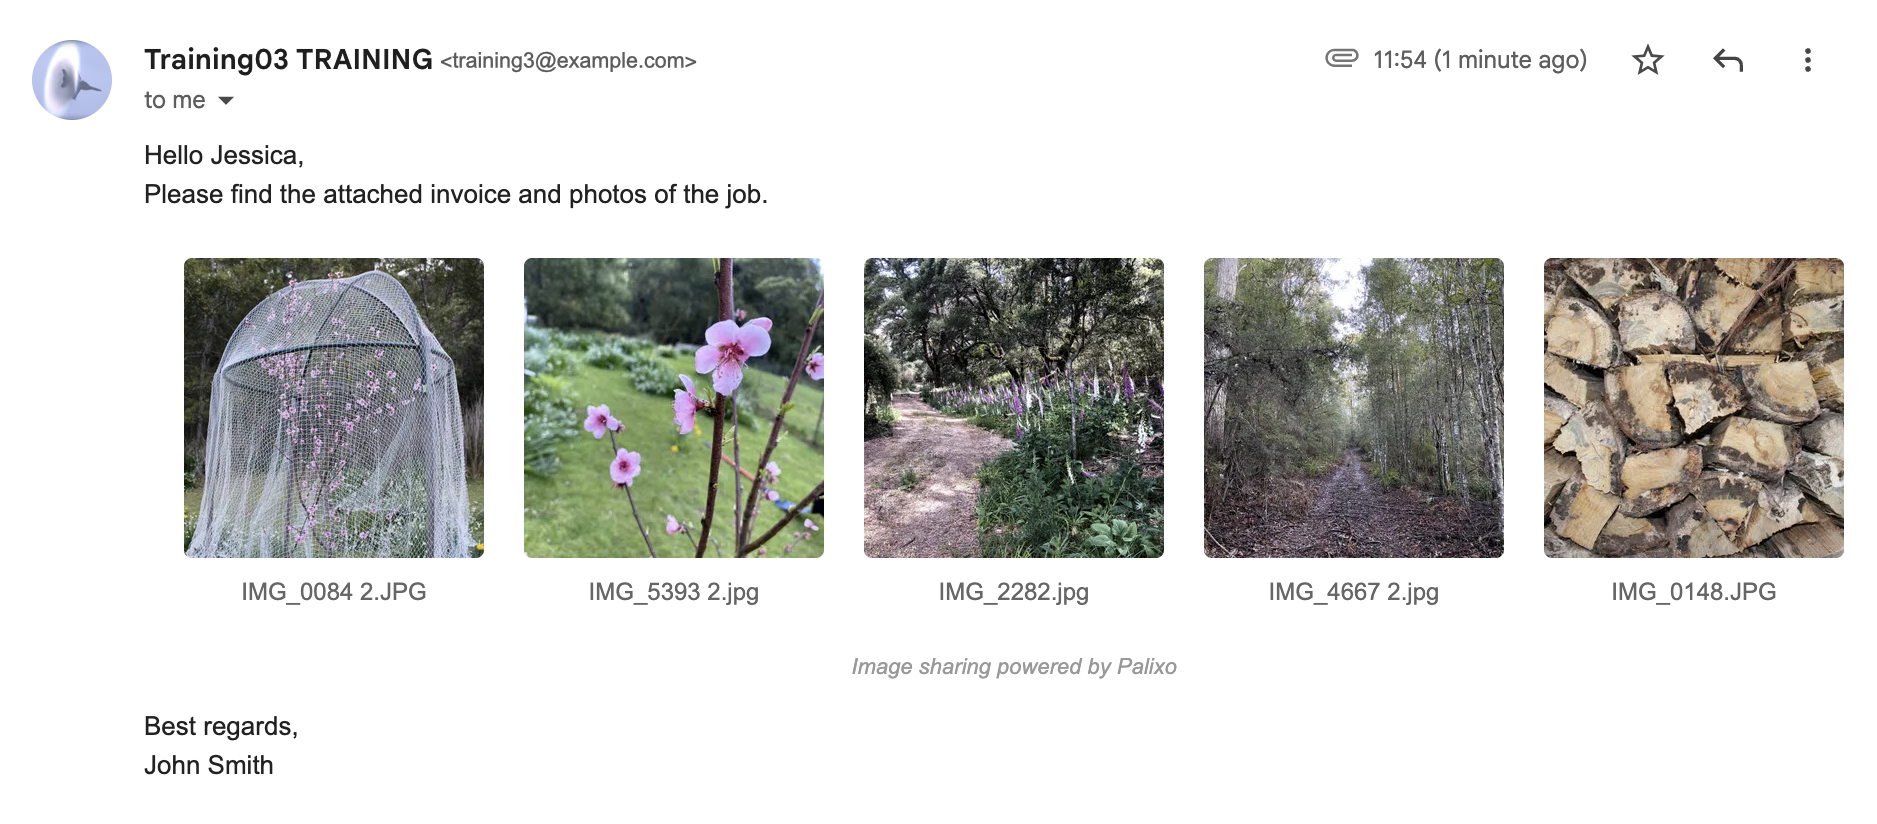
Add [[PalixoImages]] to your email template where you want the photo thumbnail strip to appear. When you send the email, this field is replaced with
the selected photos.
Template Example:
Dear {{{Recipient.FirstName}}},

Please find the photos from your recent job below:

[[PalixoImages]]

If you have any questions, please don't hesitate to contact us.

Best regards,
            {{{Sender.Name}}}
If the template doesn't have the merge field the selected images are displayed at the end of the email.
You can edit email templates directly in Salesforce Lightning under your personal settings or ask your Salesforce administrator for assistance.
9.3 Selecting Photos From Palixo
When sending an email from the Quote, Invoice or Work Order:
- Start your email as normal
- Look for the Cloud Images section at the bottom of the composer screen
- Photos from the current record are displayed
- Click to select photos you want to include
- Selected photos show a checkmark
- The selected photos are embedded in your email when you send it
- Send the email
Tips:
- You can select photos from multiple tags
- Photos appear in the order you select them
- Thumbnail strip is responsive to screen sizes
10. Sharing Photo Collections
Collections let you share photos with external parties (like clients) who don't have Palixo accounts.
10.1 About Palixo Collections
Collections are shareable links containing a curated set of photos. Key characteristics:
- No account required — Anyone with the link can view
- Time-limited — Set expiry dates for security
- Download control — Choose whether viewers can download
- Analytics — Track views and engagement
- Secure links — Cryptographically secure, unguessable URLs
Common Use Cases:
- Sharing project photos with clients
- Sending before/after photos to prospects
- Providing photos to insurance companies
- Distributing event photos to attendees
10.2 Creating a Collection
- Open an album and select the photos you want to share (use select mode)
- Click Share in the bulk actions toolbar
- The share creation dialog opens
Configure Your Collection:
- Name the collection — Give it a descriptive name (e.g., "123 Main St - Completed Deck")
- Set an expiry period:
- 1 hour
- 1 day
- 7 days
- 30 days
- Never expire
- Enable or disable downloads — Toggle whether viewers can download photos
- Click Create Share
- Your share link is generated and displayed
- Click Copy Link to copy it to your clipboard
- Share the link via email, text, or any other method

10.3 Extending and Revoking Access to Collection Links
Managing Your Collections:
- Click the Shares dropdown in the header and select Collections
- All your collections are displayed with status indicators:
- Active (green) — Link is working
- Expiring Soon (yellow) — Will expire within 24 hours
- Expired (red) — Link no longer works
- Inactive (grey) — Manually disabled
Extending Expiry:
- Click Details on a collection
- Click Extend next to the expiry date
- Choose extension duration:
- 1 hour
- 1 day
- 7 days
- 30 days
- Never expire
Disabling a Collection:
- From the collection details or list, click Disable
- Confirm the action
- The link immediately stops working
- You can re-enable it later if needed (before expiry)
Permanently Deleting:
Disabled collections can be deleted entirely from the details page. This action cannot be undone.
10.4 Collection Viewing Statistics
Each collection tracks analytics to help you understand engagement:
Available Metrics:
- Share Views — Total times the collection page was opened
- Picture Views — Total individual photo views
- Unique Visitors — Number of different people who viewed
- Downloads — Total downloads (if enabled)
- Last Accessed — When someone last viewed the collection
Device Breakdown:
A chart shows the split between desktop, mobile, and tablet viewers.
Recent Activity:
A log shows recent access events including:
- Timestamp
- Action (view or download)
- Device type
- Geographic indicator

11. Account Settings
Manage your Palixo account preferences and information.
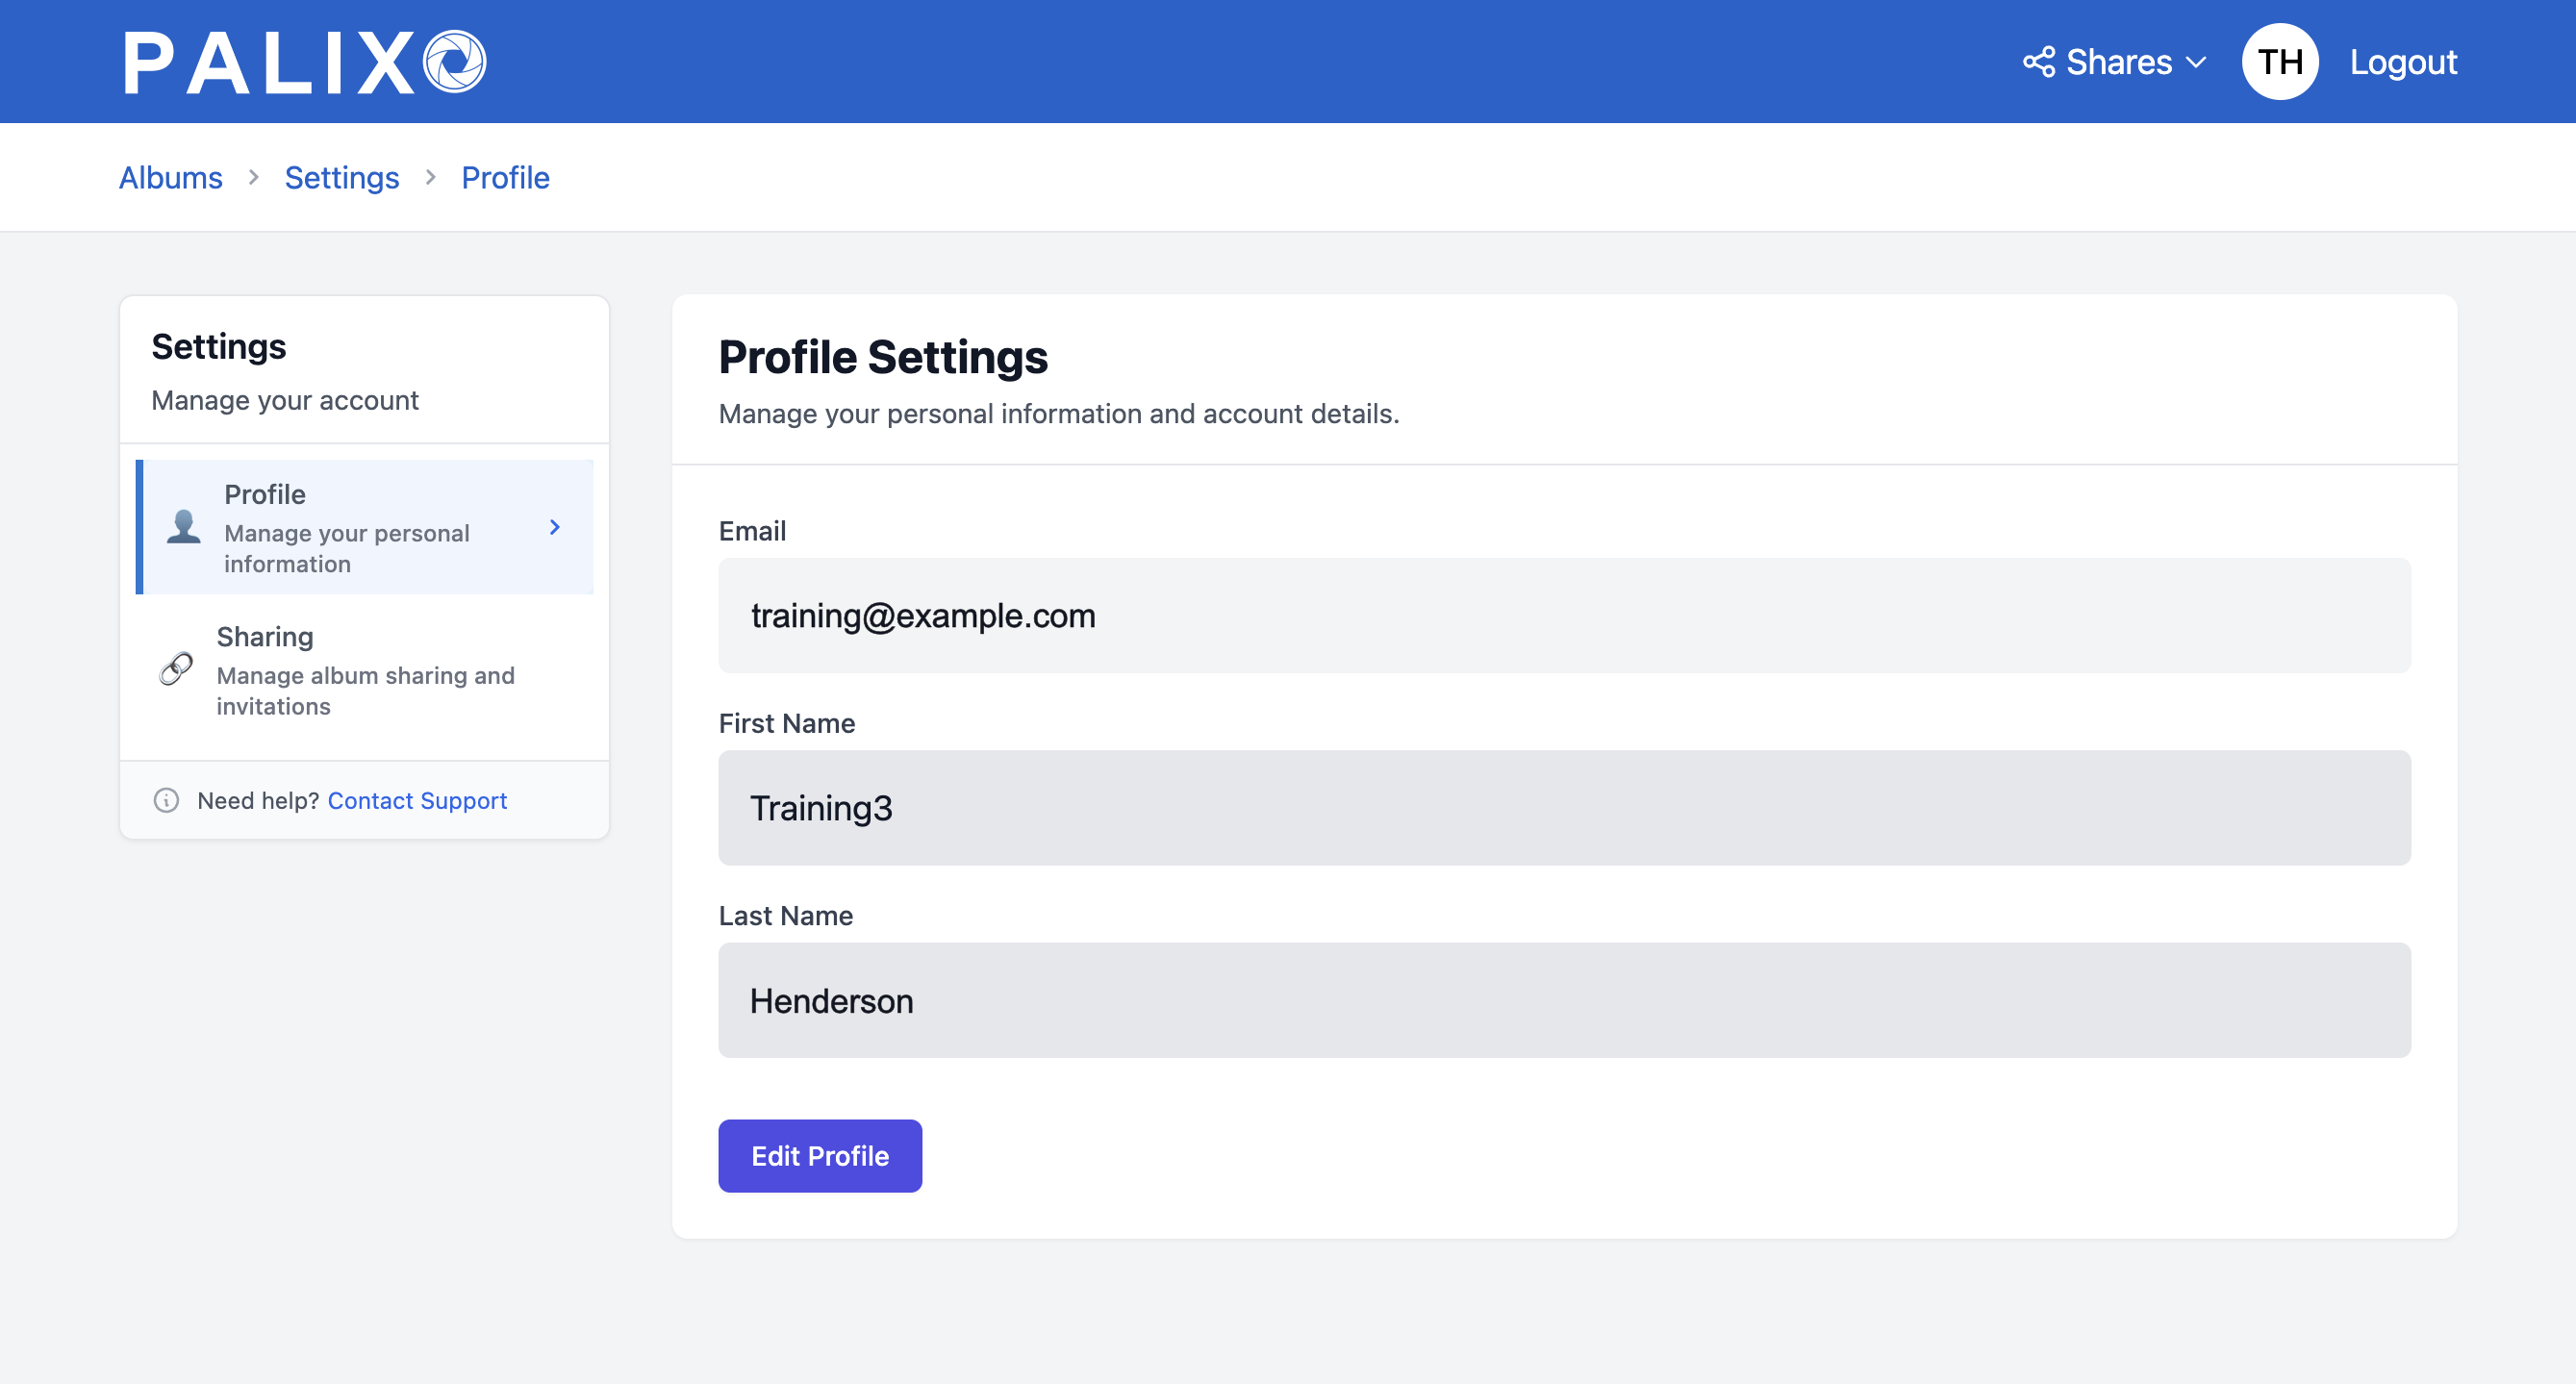
11.1 Changing Your Details
Access your account settings:
- Click your profile icon (your initials) in the header
- You'll be taken to the Profile Settings page
Editable Information:
- First Name — Your given name
- Last Name — Your family name
Making Changes:
- Click on the field you want to edit
- Enter your new information
- Click Save
Email Address:
Your email address is linked to your account and cannot be changed directly. Contact support if you need to update your email.
Password:
To change your password, log out and use the Forgot Password link on the login screen. You'll receive an email with a code to allow you to set a new password.
12. Troubleshooting & FAQs
12.1 Troubleshooting
Camera Shows Black Screen
Symptoms: The camera interface loads but shows only a black preview.
Solutions:
- Ensure you've granted camera permission to your browser
- Close and reopen your browser completely
- On iOS, try killing Safari from the app switcher and reopening
- Check that no other app is using the camera
- Try switching between front and rear cameras
Photos Not Uploading
Symptoms: Photos appear to be taken but don't appear in the album.
Solutions:
- Check your internet connection
- Wait — uploads may be in progress (look for uploading indicator)
- Don't close the browser tab until upload completes
- Refresh the album page to check if photos appear
- Try uploading a smaller photo to test connectivity
Cannot See Album / Album is Empty
Symptoms: An album you should have access to doesn't appear, or appears empty.
Solutions:
- Check your tag filters — you may have filters active hiding photos
- Click Clear Filters to show all photos
- Ensure you're logged into the correct account
- Check with the album owner that you still have access
- Try refreshing the page
Invitation Link Not Working
Symptoms: Clicking an invitation link shows an error.
Solutions:
- Check if the invitation has expired (links are valid for 7 days)
- Ensure you're using the correct email account
- Try copying and pasting the full link instead of clicking
- Ask the sender to create a new invitation
Salesforce Integration Not Working
Symptoms: Cloud Images tab doesn't load or shows errors in Salesforce.
Solutions:
- Ensure Palixo is properly registered for your Salesforce org (Contact your Administrator)
- Clear your browser cache and refresh Salesforce
- Try logging out and back into Salesforce
- Contact your Salesforce administrator
12.2 FAQs
Q: Can I use Palixo on my phone?
A: Yes! Palixo works in any modern web browser on iOS and Android. Simply navigate to https://palixo.media in Safari (iOS) or Chrome (Android). There's no separate app to install.
Q: How many photos can I store?
A: There's no limit on the number of photos you can store in Palixo.
Q: Can I share photos with someone who doesn't have a Palixo account?
A: Yes! Use the Collections feature to create shareable links. Anyone with the link can view the photos without needing an account.
Q: What happens if I delete a photo by accident?
A: Unfortunately, deleted photos cannot be recovered. Always download photos you need before deleting. Consider using the bulk download feature to create backups.
Q: Can I use Palixo offline?
A: No, Palixo requires an internet connection to function. Photos are uploaded directly to cloud storage when captured, so you need connectivity to take and save photos. The camera interface will not work offline.
Q: How do I move photos between albums?
A: Currently, photos cannot be moved between albums. To have photos in a different album, you would need to download them and re-upload to the new album with appropriate tags.
Q: What's the difference between Personal and Work albums?
A: Personal albums are private to you and cannot be shared with others. Work albums can be shared by inviting team members with different access levels (Viewer, Contributor, Administrator).
Q: How long do share links last?
A: When creating a collection, you choose the expiry period (1 hour to 30 days, or never). You can extend active links, but expired links cannot be reactivated — you'll need to create a new collection.
13. Contact & Support
13.1 Palixo Help
If you need assistance with Palixo:
Email Support:
support@palixo.media
Response Time:
We aim to respond to all support requests within 24 hours during business days.
When Contacting Support, Include:
- Your email address (account identifier)
- Description of the issue
- Steps to reproduce the problem
- Screenshots if applicable
- Browser and device information
13.2 We Love Your Feedback
Your feedback helps us improve Palixo. We want to hear about:
- Features you love
- Pain points in your workflow
- Confusing aspects of the interface
- Success stories
Send Feedback:
feedback@palixo.media
13.3 Send Us Your Feature Requests
Have an idea that would make Palixo better for your team?
Submit Feature Requests:
feedback@palixo.media
What Makes a Great Feature Request:
- Describe the problem you're trying to solve
- Explain your current workaround (if any)
- Suggest how you'd like it to work
- Share how many people on your team would benefit
We review all feature requests and prioritise based on user impact. While we can't implement every suggestion, your input directly influences our product roadmap.